
4 posts tagged with "web"

View All Tags

· 8 min read
Lê Sĩ Bích

Overview

Vào ngày 28/5/2021, trên blog của Rails có thông báo về 1 tính năng mới đó là ActiveRecord Encryption.

ActiveRecord Encryption giúp encrypt attribute nào đó của model, và lưu vào DB dưới dạng mã hoá. Tính năng này được extract ra từ dự án HEY của Basecamp.

Hãy thử tìm hiểu xem tính năng này có gì thú vị.

Usage

Theo guide, đầu tiên chúng ta sẽ cần phải chạy câu lệnh sau

rails db:encryption:init

Rails sẽ cho ta 1 gợi ý là copy đống sau vào credentials. Ừ EDITOR=vim rails credentials:edit rồi copy paste thôi.

active_record_encryption:
primary_key: EGY8WhulUOXixybod7ZWwMIL68R9o5kC
deterministic_key: aPA5XyALhf75NNnMzaspW7akTfZp0lPY
key_derivation_salt: xEY0dt6TZcAMg52K7O84wYzkjvbA62Hz

Trong model, ta define attribute cần mã hoá như sau:

class Article < ApplicationRecord
encrypts :title
end

Rồi create/update model như bình thường

article = Article.create(title: "Encrypt it all!")

Và bùm, magic...

INSERT INTO `articles` (`title`) VALUES ('{\"p\":\"n7J0/ol+a7DRMeaE\",\"h\":{\"iv\":\"DXZMDWUKfp3bg/Yu\",\"at\":\"X1/YjMHbHD4talgF9dt61A==\"}}')

Vô hạn bối rối...

AES

Trước tiên ta hãy tìm hiểu về đống key mà Rails đã gen cho ta lúc đầu

active_record_encryption:
primary_key: EGY8WhulUOXixybod7ZWwMIL68R9o5kC
deterministic_key: aPA5XyALhf75NNnMzaspW7akTfZp0lPY
key_derivation_salt: xEY0dt6TZcAMg52K7O84wYzkjvbA62Hz

Rails gen ra đống trên như nào vậy?

puts <<~MSG
Add this entry to the credentials of the target environment:#{' '}

active_record_encryption:
primary_key: #{SecureRandom.alphanumeric(32)}
deterministic_key: #{SecureRandom.alphanumeric(32)}
key_derivation_salt: #{SecureRandom.alphanumeric(32)}
MSG

Nếu ai chưa biết thì đây là standard lib của Ruby, đơn thuần là... random mà thôi =))

Thế đống key này để làm gì? Ở mục Setup của guide, Rails cũng đã gợi ý cho ta, đống này dùng cho AES.

this will be used to derive the AES 32 bytes key

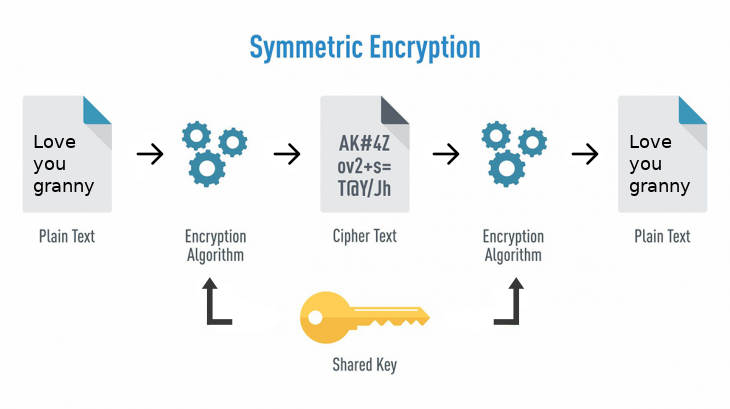
Vậy AES là cái khỉ mốc gì? Theo wiki, AES là viết tắt của Advanced Encryption Standard. Hay còn được biết đến với cái tên Rijndael. AES là 1 chuẩn mã hoá, sử dụng symmetric encryption. AES rất phổ biến ngày nay.

Thế bất nào mà lại đẻ ra thêm nhiều thuật ngữ hại não hơn vậy =)) Cứ từ từ rồi khoai sẽ nhừ, chúng ta sẽ tìm hiểu tiếp.

Trước hết thì, thế nào là mã hoá? Ví dụ như ở 1 diễn đàn nào đó người ta share nhau hoàng thuỳ link bằng đống kí tự này

68747470733A2F2F7777772E676F6F676C652E636F6D2E766E2F

thay vì huỵch toẹt ra là một đường link đồi truỵ nào đó. Nhưng do việc giải mã quá đơn giản, cụ thể là dùng mã HEX, nên đây chỉ là encode/decode sang 1 dạng dữ liệu khác mà thôi, và việc chuyển đổi thường khá nhanh. Các bạn có thể vào đây đây để decode chuỗi huyền bí trên.

Còn encrypt và decrypt dùng trong cryptography nó ở 1 tầm cao khác. Thông thường sẽ có thêm 1 key (hoặc 1 cặp key public/private). Khi đó input sẽ là key + data. Và output sẽ là 1 chuỗi nào đó, chuỗi này cực kì khó để giải mã nếu không nắm trong tay key. Thông thường thì phải cho chạy thuật toán vét cạn - tức là thử từng key một, và việc này cần đến hàng triệu năm đối với cả siêu máy tính.

  • Với thuật toán dùng 1 key cho cả việc encrypt lẫn decrypt thì sẽ được gọi là symmetric encryption

symmetric

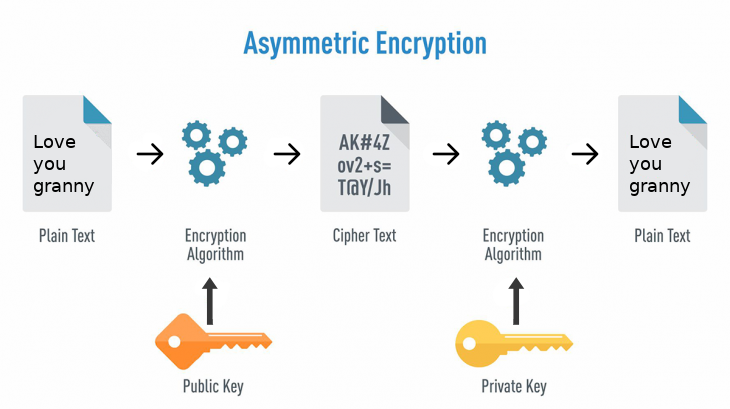
  • Thuật toán dùng 1 cặp key, trong đó public key để mã hoá, còn private key để giải mã, được gọi là asymmetric encryption

asymmetric

Image source

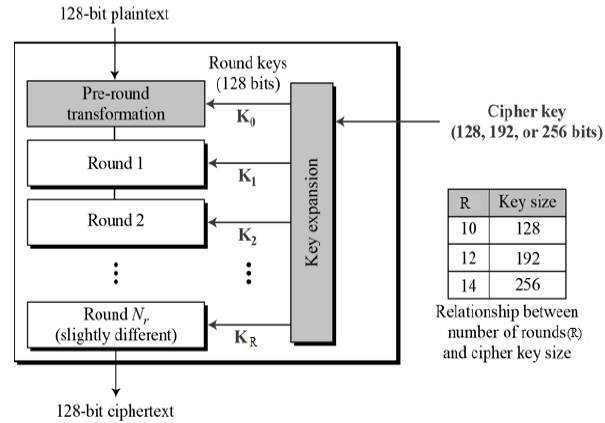
Quay lại với AES, nó dùng symmetric, nên sẽ dùng 1 key cho cả việc mã hoá lẫn giải mã. AES key có độ dài là 128, 192, hoặc 256 bit. Tuỳ vào độ dài key nó sẽ có tên khác nhau AES-128, AES-192, AES-256. Key càng dài thì việc xử lý càng lâu, nhưng đổi lại càng bảo mật hơn. Mặc định Rails sử dụng key có độ dài 256 bit (32 bytes)

CIPHER_TYPE = "aes-256-gcm"

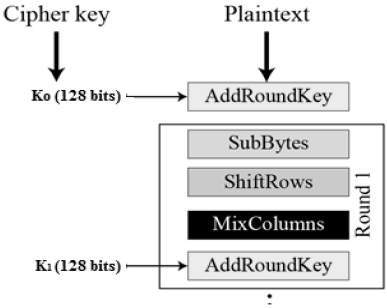
Về việc làm thế nào để AES mã hoá/giải mã thì mình sẽ không đề cập tại đây vì mình cũng không có hiểu mấy =)), nếu ai muốn tìm hiểu thêm có thể xem link này, hoặc gúc gồ ~~. Ở dưới là bản preview, trông cái thuật toán nó nôm na như sau

AES sẽ chia nhỏ input thành từng block để xử lý

block-cipher

flow

round

Image Source

Cơ mà chỉ quan tâm là một chuỗi đầu vào + 1 key, đi qua đống black magic rồi trở thành 1 chuỗi bảo mật siêu hạng là quá đủ cho một cuộc tình rồi.

À mà nhìn cái constant Rails define ở trên kia, lại có thêm cái gì ở cuối chuỗi thế nhỉ. gcm???? Bối rối again.
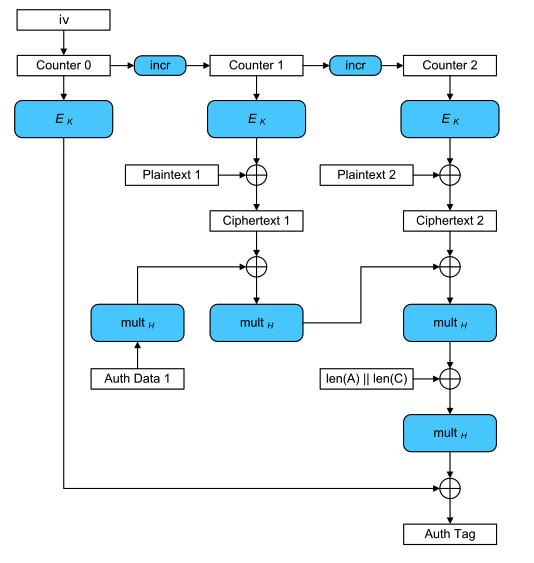
GCM

GCM là viết tắt của Galois/Counter Mode... Nghe xong hiểu chết liền .__. Mò thử xem nào!

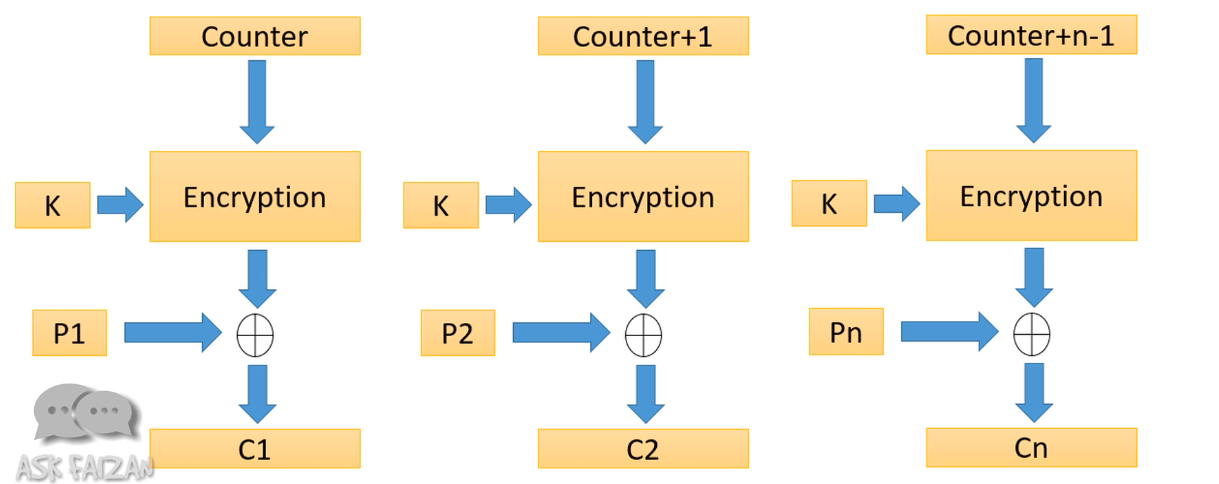
Như tên gọi của nó, GCM là một mode trong symmetric encryption, kết hợp của Counter ModeGalois Mode, dùng cho mã hoá dạng khối (block). Vậy thì AES đi với GCM là chuẩn bài rồi nhỉ.

Ngoài GCM ra còn các mode khác như CCM, SIV, ...vân vân mây mây. Các bạn có thể xem thêm tại đây

Trước tiên ta hãy bắt đầu từ mode, từ này nằm trong Mode of Operation. Các mode sẽ được apply trên từng block data (như đã nói ở trên thì AES chia data thành các block nhỏ và mã hoá), giúp cho output của việc mã hoá block bảo mật hơn.

Counter mode sử dụng 1 số integer làm counter, qua từng block counter sẽ tăng lên 1. Ở mỗi block, số này sẽ được mã hoá cùng với data để có được output bảo mật hơn.

counter-mode

Galois Mode là một authentication mode. Galois Mode giúp đảm bảo rằng cipher output của ta không bị chỉnh sửa bởi một bên thứ 3. Hoạt động như nào thì mình chịu à =))

Kết hợp 2 mode trên và ta có GCM, giúp thuật toán mã hoá của ta bảo mật hơn, đồng thời đảm bảo được tính toàn vẹn của dữ liệu.

gcm-mode

Bên trên là giải thích sơ qua về thuật toán mã hoá mà Rails sử dụng, nếu có sai sót thì cũng đừng gạch đá tội mình =))

AES-256-GCM meets Rails

Encryption Key

active_record_encryption:
primary_key: EGY8WhulUOXixybod7ZWwMIL68R9o5kC
deterministic_key: aPA5XyALhf75NNnMzaspW7akTfZp0lPY
key_derivation_salt: xEY0dt6TZcAMg52K7O84wYzkjvbA62Hz

Quay trở lại với đống key, hãy cùng mò code đáy bể xem chúng dẫn ta tới đâu :v

# https://github.com/rails/rails/blob/9c091b4fd378df515c4c31b85bb6a968463a1d82/activerecord/lib/active_record/railtie.rb#L313-L317
ActiveRecord::Encryption.configure \
primary_key: app.credentials.dig(:active_record_encryption, :primary_key),
deterministic_key: app.credentials.dig(:active_record_encryption, :deterministic_key),
key_derivation_salt: app.credentials.dig(:active_record_encryption, :key_derivation_salt),
**config.active_record.encryption

# https://github.com/rails/rails/blob/9c091b4fd378df515c4c31b85bb6a968463a1d82/activerecord/lib/active_record/encryption/configurable.rb#L20-L33
def configure(primary_key:, deterministic_key:, key_derivation_salt:, **properties)
config.primary_key = primary_key
config.deterministic_key = deterministic_key
config.key_derivation_salt = key_derivation_salt

context.key_provider = ActiveRecord::Encryption::DerivedSecretKeyProvider.new(primary_key)
end

# https://github.com/rails/rails/blob/9c091b4fd378df515c4c31b85bb6a968463a1d82/activerecord/lib/active_record/encryption/derived_secret_key_provider.rb#L7-L9
def initialize(passwords)
super(Array(passwords).collect { |password| Key.derive_from(password) })
end

Xem tiếp class Key có gì nào.

# https://github.com/rails/rails/blob/9c091b4fd378df515c4c31b85bb6a968463a1d82/activerecord/lib/active_record/encryption/key.rb#L10-L26
class Key
def initialize(secret)
@secret = secret
@public_tags = Properties.new
end

def self.derive_from(password)
secret = ActiveRecord::Encryption.key_generator.derive_key_from(password)
ActiveRecord::Encryption::Key.new(secret)
end
end

# https://github.com/rails/rails/blob/9c091b4fd378df515c4c31b85bb6a968463a1d82/activerecord/lib/active_record/encryption/key_generator.rb#L32-L34
def derive_key_from(password, length: key_length)
ActiveSupport::KeyGenerator.new(password).generate_key(ActiveRecord::Encryption.config.key_derivation_salt, length)
end

Như vậy, 2 trong số 3 thanh niên của ta đã bị lộ mặt:

  • primary_key đóng vai trò là password param của ActiveSupport::KeyGenerator.new
  • key_derivation_salt đóng vai trò là tham số thứ nhất của ActiveSupport::KeyGenerator#generate_key

Hãy check tiếp ActiveSupport::KeyGenerator

# https://github.com/rails/rails/blob/9c091b4fd378df515c4c31b85bb6a968463a1d82/activesupport/lib/active_support/key_generator.rb#L26-L41
def initialize(secret, options = {})
@secret = secret
@iterations = options[:iterations] || 2**16
@hash_digest_class = options[:hash_digest_class] || self.class.hash_digest_class
end

def generate_key(salt, key_size = 64)
OpenSSL::PKCS5.pbkdf2_hmac(@secret, salt, @iterations, key_size, @hash_digest_class.new)
end

Qua hết wrapper của Rails rồi, giờ ta phải mò vào docs của Ruby thôi. Theo docs, docs lại bảo hàm này giờ đổi tên thành OpenSSL::KDF.pbkdf2_hmac mất rồi... Ờ thì lại mò vào xem. Nôm na hàm này sẽ tạo ra 1 cipher key dùng cho việc mã hoá.

Tại đây, ta có thể kết luận key mã hoá mà Rails dùng có:

  • passphrase: primary_key
  • salt: key_derivation_salt
  • iterations: 2^16
  • key_len: độ dài key 32 bytes
  • digest: hash algorithm SHA-1

Hãy cùng test qua cái key này xem

require 'openssl'

cipher = OpenSSL::Cipher.new('aes-256-gcm')
cipher.encrypt
iv = cipher.random_iv

pwd = 'EGY8WhulUOXixybod7ZWwMIL68R9o5kC'
salt = 'xEY0dt6TZcAMg52K7O84wYzkjvbA62Hz'
iter = 2**16
key_len = OpenSSL::Cipher.new("aes-256-gcm").key_len
digest = OpenSSL::Digest.new('SHA1')

key = OpenSSL::PKCS5.pbkdf2_hmac(pwd, salt, iter, key_len, digest)
cipher.key = key

encrypted = cipher.update "hello"
encrypted << cipher.final # => "\xB2#\x10\xE7n"

cipher.decrypt
cipher.iv = iv
decrypted = cipher.update(encrypted) # => "hello"

Sau bao nhiêu vất vả thì cũng tìm được cái key =)) Vậy quá trình mã hoá như thế nào? Lại mò tiếp .__.

Encryption Process

Hãy cùng bắt đầu từ việc khai báo trong model

class Article < ApplicationRecord
encrypts :title
end

Rồi cùng tìm xem ApplicationRecord.encrypts nó làm trò gì nào

Tham khảo

· 3 min read
Lê Sĩ Bích

WebSocket là gì

Cũng giống như HTTP, WebSocket là 1 protocol, hoạt động trên mô hình client/server, và sử dụng TCP connection. Là một protocol, có nghĩa là bất kể việc implement ra sao, nhưng server cứ lắng nghe 1 TCP port, và giao tiếp giữa client/server tuân theo đúng spec mà WebSocket đề ra là được.

WebSocket cho phép trao đổi dữ liệu 2 chiều giữa client và server. Tuy nhiên chắc sẽ có nhiều người thắc mắc

Sao không dùng HTTP rồi set interval request lên, hay là server push cho đơn giản. Đẻ ra lắm protocol làm gì đau đầu?

Nếu sử dụng HTTP, mỗi lần cập nhật data mới thì client lại phải tạo request HTTP, và sẽ có rất nhiều header dư thừa, gây lãng phí băng thông, và việc khởi tạo request cũng mất thêm 1 chút thời gian. Trong khi đó WebSocket, sau khi client và server say hello với nhau, TCP connection sẽ vẫn alive, và chúng sẽ giao lưu kết hợp với nhau qua connection đó mà không cần thêm những thông tin dư thừa như header. Và có lẽ còn nhiều lợi ích nữa, nhưng mình không biết =))

Khen thế đủ rồi, hãy thử tìm hiểu xem WebSocket ngang dọc ra sao.

Cách hoạt động của WebSocket

Tiền đề

Ví dụ với ứng dụng mạng xã hội, ta có 1 tính năng chat. Mỗi khi bật chat với 1 người, 1 WebSocket tới webserver của ta sẽ được khởi tạo. Như vậy, ta đang có 1 webserver, và đang cần 1 websocket connection tới webserver đó. Mặt khác việc sử dụng raw TCP trên client cũng rất hạn chế. Chính vì vậy, WebSocket đã tận dụng luôn port 80/443 của HTTP(S) để khởi tạo connection.

Handshaking

Khi khởi tạo connection, client sẽ tạo 1 HTTP request để thực hiện handshake với server

handshake

  • Trước tiên client sẽ gửi request tới endpoint mà websocket server đang lắng nghe. ví dụ như /chat. Request sẽ kèm theo 1 vài header mà WebSocket protocol quy định: Sec-WebSocket-Key, Sec-WebSocket-Version, Upgrade, Connection, ... và những header cơ bản của 1 HTTP request khác nữa.

  • WebSocket server sẽ tiếp nhận request, authen (nếu có), nếu không hợp lệ sẽ trả về 400 Bad Request và terminate connection đó. Ngược lại nếu OK, server sẽ trả về 101 Switching Protocols cùng với header Sec-WebSocket-Accept. Connection đó sẽ được giữ, và sau đó client và server bắt đầu trao đổi thông tin qua lại với nhau.

Giá trị của Sec-WebSocket-Accept được quy định như sau:

Sec-WebSocket-Accept = Base64( SHA1 ( Sec-WebSocket-Key + 258EAFA5-E914-47DA-95CA-C5AB0DC85B11 ) )

258EAFA5-E914-47DA-95CA-C5AB0DC85B11 còn được gọi là magic string

Trao đổi dữ liệu

Việc trao đổi dữ liệu giữa client và server khá là hại não, cụ thể việc decode message, hay format message có thể xem thêm tại đây. Giữ chỗ để sau này nếu không lười bận quay lại tìm hiểu sau =))

Trong quá trình connection được keep alive, sẽ có rất nhiều request ping giữa client/server để kiểm tra xem phía bên kia còn active hay không. Bên gửi ping, bên nhận pong, vẫn còn sống thì ta lại giao lưu kết hợp tiếp. Còn không thì server/client sẽ biết để terminate inactive connection đó đi.

Tham khảo

· 11 min read
Lê Sĩ Bích

Rails 6 đã bước vào giai đoạn beta với phiên bản v6.0.0.rc1. RC là viết tắt của Release Candidate, đây là phiên bản mà có xác suất trở thành final release rất cao. Ta có thể áp dụng nó vào dự án ngay kể từ bây giờ mà không cần lo sợ có những breaking change.

Nếu bạn sử dụng Docker, mình khuyên nên sử dụng ruby 2.6.3, vì trước đây mình đã dùng thử ruby:2.7.0-preview1-alpine3.10 thì khá nhiều lỗi khi up server, mà chả biết phải fix sao :sad:

Ở Rails 6, có khá nhiều tính năng mới hay ho:

  • Action Text
  • Parallel Testing
  • Action Model custom error message format.
  • vân vân mây mây...

Ở bài này, mình sẽ chỉ tập trung đề cập tới Action Text. Đây là một package giúp ta xây dựng WYSIWYG editor một cách nhanh chóng, hơn nữa, việc upload cũng được integrate với Active Storage.

Chú ý: Bài khá dài và embed nhiều code :v

Cách dùng

Cài đặt và sử dụng

Vì là Rails nên cách sử dụng rất đơn giản, nhưng ta sẽ chả biết nó chạy cái gì đằng sau cả =))

Cài đặt Action Text bằng CLI command sau:

rails action_text:install

Nhớ hãy chạy thêm cả command install Active Storage nữa.

rails active_storage:install

Để áp dụng cho field content của model Post, ta sẽ dùng tới macro has_rich_text

class CreatePosts < ActiveRecord::Migration[6.0]
def change
create_table :posts do |t|
t.string :content
t.string :category

t.timestamps
end
end
end

content ở đây mình dùng string, nhưng khuyến khích dùng text hơn.

class Post < ApplicationRecord
has_rich_text :content
end

Trên form, ta chỉ việc dùng rich_text_area

<%= form_with(model: @post) do |form| %>
<div class="field">
<%= form.label :content %>
<%= form.rich_text_area :content %>
</div>
<% end %>

Khi permit params, ta cũng làm như bao field khác


class PostsController < ApplicationController
def post_params
params.require(:post).permit(:category, :content)
end
end

Cuối cùng ta hiển thị dữ liệu như sau:

<%= @post.content %>

Câu lệnh trên thực chất đang ngầm gọi tới @post.content.to_s

Đây là sản phẩm của ta:

Form tạo post với WYSIWYG editor - Sử dụng Trix editor, do Basecamp phát triển, cây nhà lá vườn luôn.

Có thể kéo thả file vào, file đó sẽ được upload bằng Active Storage.

Hiển thị dữ liệu ở màn hình detail

Các bạn thấy sao? Cá nhân mình thấy xấu như cờ hó vậy =)) Tuy nhiên ta có thể styling cho nó.

Styling

Rails đang có sẵn một vài style cơ bản cho nó trong file app/assets/stylesheets/actiontext.scss, ta có thể sửa nó để cho đẹp hơn.

Với đống tool của editor thì có thể dùng selector .trix-button-row

Với template attachment (như cái monaco.ttf ở trên), ta cũng có thể custom lại, Rails cung cấp sẵn template mặc định ở file app/views/active_storage/blobs/_blob.html.erb

Tìm hiểu sự ma giáo

Rồi ta đã lướt qua cách sử dụng nó, nhưng mà có quá nhiều magic.

Liệu bạn có tự đặt ra những câu hỏi thế này hay không?

  • Không biết cách lưu trữ dữ liệu của nó như thế nào?

  • Làm sao mà cái file trong kia integrate được với Active Storage?

  • Vì sao lại có thể custom lại những attachment bằng template?

  • vân vân mây mây...

Ta sẽ bắt tay vào tìm hiểu nó.

Hãy bắt đầu với has_rich_text

Macro has_rich_text

# https://github.com/rails/rails/blob/6a5c8b91998c56e50b5cc934d968947cd319f735/actiontext/lib/action_text/attribute.rb#L26
def has_rich_text(name)
class_eval <<-CODE, __FILE__, __LINE__ + 1
def #{name}
rich_text_#{name} || build_rich_text_#{name}
end

def #{name}=(body)
self.#{name}.body = body
end
CODE

has_one :"rich_text_#{name}", -> { where(name: name) },
class_name: "ActionText::RichText", as: :record, inverse_of: :record, autosave: true, dependent: :destroy
# ... codes
end

Dễ dàng thấy rằng đây là 1 macro giúp định nghĩa getter, setter, và cả association has_one :rich_text_... với ActionText::RichText.

Vậy thì khi ta gọi @post.content, thực chất là ta đang gọi tới @post.rich_text_content.

Và nó cũng chỉ ra 1 điều nữa là Rails dùng 1 bảng riêng để lưu lại đống rich text của ta.

Hãy dành chút thời gian nhìn vào thư mục db/migrate, ta sẽ thấy file sau:

# db/migrate/20190718085159_create_action_text_tables.action_text.rb
# This migration comes from action_text (originally 20180528164100)
class CreateActionTextTables < ActiveRecord::Migration[6.0]
def change
create_table :action_text_rich_texts do |t|
t.string :name, null: false
t.text :body, size: :long
t.references :record, null: false, polymorphic: true, index: false

t.timestamps

t.index [ :record_type, :record_id, :name ], name: "index_action_text_rich_texts_uniqueness", unique: true
end
end
end

Quả thật là vậy, body chính là nơi lưu trữ đống text của ta, còn name, record_id, và record_type là những attribute cho polymorphic association, khá quen thuộc nếu bạn đã dùng Active storage

Ta sẽ đi đến bước tiếp theo rich_text_area

Rails xử lý, lưu trữ rich text như thế nào?

# https://github.com/rails/rails/blob/cc1a5d5620c4cd952b27f6c1bbd16d8780a34d0e/actiontext/app/helpers/action_text/tag_helper.rb#L20
def rich_text_area_tag(name, value = nil, options = {})
options = options.symbolize_keys

options[:input] ||= "trix_input_#{ActionText::TagHelper.id += 1}"
options[:class] ||= "trix-content"

options[:data] ||= {}
options[:data][:direct_upload_url] = main_app.rails_direct_uploads_url
options[:data][:blob_url_template] = main_app.rails_service_blob_url(":signed_id", ":filename")

editor_tag = content_tag("trix-editor", "", options)
input_tag = hidden_field_tag(name, value, id: options[:input])

input_tag + editor_tag
end

Có thể thấy đơn giản nó chỉ init cái trix editor cho ta thôi.

Việc kéo thả file, upload hoàn toàn được handle bởi trix editor, ta không custom được template sau khi file upload thành công.

Tuy nhiên Action Text có thêm 1 callback sau khi file được upload thành công:

// https://github.com/rails/rails/blob/cc1a5d5620c4cd952b27f6c1bbd16d8780a34d0e/actiontext/app/javascript/actiontext/attachment_upload.js#L26
this.attachment.setAttributes({
sgid: attributes.attachable_sgid,
url: this.createBlobUrl(attributes.signed_id, attributes.filename),
});

đây là 1 step rất quan trọng, nhưng ta sẽ chưa cần chú ý tới nó vội. Attachment của ta sau khi upload thành công sẽ trông như sau:

<figure
contenteditable="false"
data-trix-attachment='{"contentType":"application/zip","filename":"monaco.ttf-master.zip","filesize":88996,"sgid":"BAh7CEkiCGdpZAY6BkVUSSIvZ2lkOi8vYXBwL0FjdGl2ZVN0b3JhZ2U6OkJsb2IvOD9leHBpcmVzX2luBjsAVEkiDHB1cnBvc2UGOwBUSSIPYXR0YWNoYWJsZQY7AFRJIg9leHBpcmVzX2F0BjsAVDA=--79d2aa5a0af367233a5420a4f0ae02657d3910ab","url":"http://localhost:60100/rails/active_storage/blobs/eyJfcmFpbHMiOnsibWVzc2FnZSI6IkJBaHBEUT09IiwiZXhwIjpudWxsLCJwdXIiOiJibG9iX2lkIn19--e79bebbfa0f10319d319411c129291d12e752d22/monaco.ttf-master.zip"}'
data-trix-content-type="application/zip"
data-trix-id="1108"
class="attachment attachment--file attachment--zip"
>
<figcaption class="attachment__caption">
<span class="attachment__name">monaco.ttf-master.zip</span>
<span class="attachment__size">86.91 KB</span>
</figcaption>
</figure>

Tiếp đến là submit dữ liệu, vậy Rails sẽ gửi gì lên?

Đơn giản là Rails sẽ gửi tất cả những gì bên trong <trix-editor></trix-editor>

Inspect thử params, ta sẽ thấy:

post_params[:content]
# => "<div><a href=\"http://localhost:60100/posts/new\">http://localhost:60100/posts/new</a></div><div><strong>Hello world<br></strong><figure data-trix-attachment=\"{&quot;content&quot;:&quot;<figure class=\\&quot;attachment attachment--file attachment--zip\\&quot;>\\n\\n <figcaption class=\\&quot;attachment__caption\\&quot;>\\n <span class=\\&quot;attachment__name\\&quot;>monaco.ttf-master.zip</span>\\n <span class=\\&quot;attachment__size\\&quot;>86.9 KB</span>\\n </figcaption>\\n</figure>\\n&quot;,&quot;contentType&quot;:&quot;application/zip&quot;,&quot;filename&quot;:&quot;monaco.ttf-master.zip&quot;,&quot;filesize&quot;:88996,&quot;sgid&quot;:&quot;BAh7CEkiCGdpZAY6BkVUSSIvZ2lkOi8vYXBwL0FjdGl2ZVN0b3JhZ2U6OkJsb2IvNz9leHBpcmVzX2luBjsAVEkiDHB1cnBvc2UGOwBUSSIPYXR0YWNoYWJsZQY7AFRJIg9leHBpcmVzX2F0BjsAVDA=--97b885c24fd3d87464525f34a7b6ea117e4c72e6&quot;,&quot;url&quot;:&quot;http://localhost:60100/rails/active_storage/blobs/eyJfcmFpbHMiOnsibWVzc2FnZSI6IkJBaHBEQT09IiwiZXhwIjpudWxsLCJwdXIiOiJibG9iX2lkIn19--940badfc5aee704ef3f98085f87f909baf870660/monaco.ttf-master.zip&quot;}\" data-trix-content-type=\"application/zip\" class=\"attachment attachment--content attachment--zip\"><figure class=\"attachment attachment--file attachment--zip\">\r\n\r\n <figcaption class=\"attachment__caption\">\r\n <span class=\"attachment__name\">monaco.ttf-master.zip</span>\r\n <span class=\"attachment__size\">86.9 KB</span>\r\n </figcaption>\r\n</figure>\r\n<figcaption class=\"attachment__caption\"></figcaption></figure></div>"

Làm đẹp nó chút

<div>
<a href="http://localhost:60100/posts/new"
>http://localhost:60100/posts/new</a
>
</div>
<div>
<strong>Hello world<br /></strong>
<figure
data-trix-attachment="..."
data-trix-content-type="application/zip"
class="attachment attachment--content attachment--zip"
>
<figure class="attachment attachment--file attachment--zip">
<figcaption class="attachment__caption">
<span class="attachment__name">monaco.ttf-master.zip</span>
<span class="attachment__size">86.9 KB</span>
</figcaption>
</figure>
<figcaption class="attachment__caption"></figcaption>
</figure>
</div>

Có thể thấy nó khá giống với content của <trix-editor></trix-editor> đúng không nào?

Ta sẽ save đống params này lại, và xem DB ta chứa gì?

app_development=# SELECT body FROM action_text_rich_texts WHERE id = 3;
<div>
<a href="http://localhost:60100/posts/new"
>http://localhost:60100/posts/new</a
>
</div>
<div>
<strong>Hello world<br /></strong>
<action-text-attachment
sgid="BAh7CEkiCGdpZAY6BkVUSSIvZ2lkOi8vYXBwL0FjdGl2ZVN0b3JhZ2U6OkJsb2IvNz9leHBpcmVzX2luBjsAVEkiDHB1cnBvc2UGOwBUSSIPYXR0YWNoYWJsZQY7AFRJIg9leHBpcmVzX2F0BjsAVDA=--97b885c24fd3d87464525f34a7b6ea117e4c72e6"
content-type="application/zip"
url="http://localhost:60100/rails/active_storage/blobs/eyJfcmFpbHMiOnsibWVzc2FnZSI6IkJBaHBEQT09IiwiZXhwIjpudWxsLCJwdXIiOiJibG9iX2lkIn19--940badfc5aee704ef3f98085f87f909baf870660/monaco.ttf-master.zip"
filename="monaco.ttf-master.zip"
filesize="88996"
></action-text-attachment>
</div>

Các thẻ khác thì vẫn vậy, tuy nhiên attachments của ta lại có một chút khác biệt. Ở đây đống figure đã được minify lại thành action-text-attachment để cho gọn hơn.

Hãy cùng điều tra xem tại sao lại như vậy? Trước tiên ta vào xem ActionText::RichText của ta chứa gì ma giáo

# https://github.com/rails/rails/blob/027085a5972a798cfea60f829a9edabbd67a2818/actiontext/app/models/action_text/rich_text.rb#L11
class ActionText::RichText < ActiveRecord::Base
serialize :body, ActionText::Content
end

Vậy là body của ta đang được serialize bởi ActionText::Content, mò đến đó tiếp thôi.

# https://github.com/rails/rails/blob/df8ee09ce71338cdf9816225df1bdebc707f3560/actiontext/lib/action_text/content.rb#L15
class ActionText::Content
class << self
def fragment_by_canonicalizing_content(content)
fragment = ActionText::Attachment.fragment_by_canonicalizing_attachments(content)
fragment = ActionText::AttachmentGallery.fragment_by_canonicalizing_attachment_galleries(fragment)
fragment
end
end

def initialize(content = nil, options = {})
options.with_defaults! canonicalize: true

if options[:canonicalize]
@fragment = self.class.fragment_by_canonicalizing_content(content)
else
@fragment = ActionText::Fragment.wrap(content)
end
end
end

Ta sẽ quan tâm tới hàm initialize trước, khi serialize, mặc định là ta đang không dùng tham số, vậy là options sử dụng sẽ là canonicalize: true, xem tiếp fragment_by_canonicalizing_content nào. Có vẻ lại phải mò fragment_by_canonicalizing_attachments tiếp @@

# https://github.com/rails/rails/blob/df8ee09ce7/actiontext/lib/action_text/attachment.rb#L11
class ActionText::Attachment
TAG_NAME = "action-text-attachment"
SELECTOR = TAG_NAME

class << self
def fragment_by_canonicalizing_attachments(content)
fragment_by_minifying_attachments(
fragment_by_converting_trix_attachments(content)
)
end
end
end

fragment_by_minifying_attachments, bạn có thấy từ minify không? Có vẻ ta đang đi đúng hướng. Hãy tiếp tục, nhưng hãy bắt đầu bằng fragment_by_converting_trix_attachments

# https://github.com/rails/rails/blob/df8ee09ce71338cdf9816225df1bdebc707f3560/actiontext/lib/action_text/attachments/trix_conversion.rb#L9
module ActionText::Attachments::TrixConversion
class_methods do
def fragment_by_converting_trix_attachments(content)
Fragment.wrap(content).replace(TrixAttachment::SELECTOR) do |node|
from_trix_attachment(TrixAttachment.new(node))
end
end
end
end

Nôm na là đoạn này sẽ replace toàn bộ ActionText::TrixAttachment::SELECTOR = "[data-trix-attachment] bằng thẻ ActionText::Attachment::SELECTOR = "action-text-attachment".

module ActionText::Attachments::Minification
class_methods do
def fragment_by_minifying_attachments(content)
Fragment.wrap(content).replace(ActionText::Attachment::SELECTOR) do |node|
node.tap { |n| n.inner_html = "" }
end
end
end
end

Hàm fragment_by_minifying_attachments của chúng ta sẽ remove toàn bộ inner content của thẻ action-text-attachment.

Sau một hồi lòng vòng, cuối cùng ta đã biết được tại sao đống figure rối rắm kia trở thành action-text-attachment gọn gàng hơn rất nhiều.

Hiển thị dữ liệu

Hãy vào màn hình detail, và thử inspect element, ta sẽ thấy attachment của ta lại trở về dạng đầy đủ:

<%= @post.content =>

Đây là những gì ta thu được.

<div class="trix-content">
<div>
<a href="http://localhost:60100/posts/new"
>http://localhost:60100/posts/new</a
>
</div>
<div>
<strong>Hello world<br /></strong>
<action-text-attachment
sgid="BAh7CEkiCGdpZAY6BkVUSSIvZ2lkOi8vYXBwL0FjdGl2ZVN0b3JhZ2U6OkJsb2IvNz9leHBpcmVzX2luBjsAVEkiDHB1cnBvc2UGOwBUSSIPYXR0YWNoYWJsZQY7AFRJIg9leHBpcmVzX2F0BjsAVDA=--97b885c24fd3d87464525f34a7b6ea117e4c72e6"
content-type="application/zip"
url="http://localhost:60100/rails/active_storage/blobs/eyJfcmFpbHMiOnsibWVzc2FnZSI6IkJBaHBEQT09IiwiZXhwIjpudWxsLCJwdXIiOiJibG9iX2lkIn19--940badfc5aee704ef3f98085f87f909baf870660/monaco.ttf-master.zip"
filename="monaco.ttf-master.zip"
filesize="88996"
>
<figure class="attachment attachment--file attachment--zip">
<figcaption class="attachment__caption">
<span class="attachment__name">monaco.ttf-master.zip</span>
<span class="attachment__size">86.9 KB</span>
</figcaption>
</figure>
</action-text-attachment>
</div>
</div>

Bạn còn nhớ mình ghi ở trên, khi ta viết @post.content, thực chất ta đang gọi @post.content.to_s chứ?

Thử đào sâu vào chút:

# https://github.com/rails/rails/blob/df8ee09ce7/actiontext/lib/action_text/content.rb#L90
def to_rendered_html_with_layout
renderer.render(partial: "action_text/content/layout", locals: { content: self })
end

def to_s
to_rendered_html_with_layout
end
<%# https://github.com/rails/rails/blob/df8ee09ce7/actiontext/app/views/action_text/content/_layout.html.erb %>
<div class="trix-content">
<%= render_action_text_content(content) %>
</div>
# https://github.com/rails/rails/blob/0ec2a907545e47f816993b9fd8cabb552454b1a2/actiontext/app/helpers/action_text/content_helper.rb#L12
def render_action_text_content(content)
sanitize_action_text_content(render_action_text_attachments(content))
end

def sanitize_action_text_content(content)
sanitizer.sanitize(content.to_html, tags: allowed_tags, attributes: allowed_attributes, scrubber: scrubber).html_safe
end

def render_action_text_attachments(content)
content.render_attachments do |attachment|
unless attachment.in?(content.gallery_attachments)
attachment.node.tap do |node|
node.inner_html = render(attachment, in_gallery: false).chomp
end
end
end.render_attachment_galleries do |attachment_gallery|
render(layout: attachment_gallery, object: attachment_gallery) do
attachment_gallery.attachments.map do |attachment|
attachment.node.inner_html = render(attachment, in_gallery: true).chomp
attachment.to_html
end.join("").html_safe
end.chomp
end
end

Đại khái là Rails sẽ sanitize đống rich text của ta để tránh XSS attack, và render template đối với những attachment.

Integrate với Active Storage

Hãy quay trở lại với model ActionText::RichText

# https://github.com/rails/rails/blob/df8ee09ce7/actiontext/app/models/action_text/rich_text.rb#L14
class ActionText::RichText < ActiveRecord::Base
has_many_attached :embeds

before_save do
self.embeds = body.attachments.map(&:attachable) if body.present?
end
end

Ta dễ dàng hiểu 1 cách tổng quan là Rails sẽ tiến hành extract toàn bộ attachment trong body, gán vào embeds. Sau đó sẽ save đống association này lại.

Thử xem Rails sẽ extract attachments ra làm sao.

# https://github.com/rails/rails/blob/027085a5972a798cfea60f829a9edabbd67a2818/actiontext/lib/action_text/content.rb#L53
def attachables
@attachables ||= attachment_nodes.map do |node|
ActionText::Attachable.from_node(node)
end
end

# https://github.com/rails/rails/blob/027085a5972a798cfea60f829a9edabbd67a2818/actiontext/lib/action_text/content.rb#L113
def attachment_nodes
@attachment_nodes ||= fragment.find_all(ActionText::Attachment::SELECTOR)
end

Rails sẽ tìm kiếm tất cả thẻ action-text-attachment, extract những thông tin cần thiết để init được ActiveStorage::Blob object.

Ta cần nghía qua hàm Attachable.from_node nữa

# https://github.com/rails/rails/blob/027085a5972a798cfea60f829a9edabbd67a2818/actiontext/lib/action_text/attachable.rb#L10
def from_node(node)
if attachable = attachable_from_sgid(node["sgid"])
attachable
elsif attachable = ActionText::Attachables::ContentAttachment.from_node(node)
attachable
elsif attachable = ActionText::Attachables::RemoteImage.from_node(node)
attachable
else
ActionText::Attachables::MissingAttachable
end
end

Trong trường hợp này, Rails sẽ luôn extract theo strategy là sgid, các bạn không cần quan tâm tới 3 nhánh dưới làm gì cho mất công.

Còn nhớ phần trên mình đã đề cập tới sgid chứ?

//github.com/rails/rails/blob/cc1a5d5620c4cd952b27f6c1bbd16d8780a34d0e/actiontext/app/javascript/actiontext/attachment_upload.js#L26
https: this.attachment.setAttributes({
sgid: attributes.attachable_sgid,
url: this.createBlobUrl(attributes.signed_id, attributes.filename),
});

Callback này được gọi sau khi file được upload thành công. Vậy sgid là cái gì?

sigd được encrypt từ id của attachment sau khi upload. Khi gửi lên, server sẽ decrypt nó để lấy lại id, gán attachment vào record.

Tại sao lại cần encrypt? Các bạn cứ tưởng tượng, nếu dùng thẳng id, do ta upload ảnh trước khi tạo record, nên khi gửi params từ client lên, chắc chắn sẽ phải đưa attachment id vào để server lưu đúng association. Client nó gửi đúng thì không sao, nhưng nếu nó gửi id attachment của người khác thì sao? Attachment đó sẽ chuyển chủ ngay lập tức :v Còn nếu encrypt thì user đố mà mò được mã hash của attachment người khác.

attachable_from_sgid(node["sgid"]) sẽ trả về ActiveStorage::Blob object

# https://github.com/rails/rails/blob/f1b8bb4e1f16e4029ddf05515db0c01942521116/actiontext/lib/action_text/attachable.rb#L22
def from_attachable_sgid(sgid, options = {})
method = sgid.is_a?(Array) ? :locate_many_signed : :locate_signed
record = GlobalID::Locator.public_send(method, sgid, options.merge(for: LOCATOR_NAME))
record || raise(ActiveRecord::RecordNotFound)
end

Nếu không tin, bạn hãy thử rails c và gọi hàm:

GlobalID::Locator.locate_signed(sgid, { for: "attachable" })

Kết luận

Action Text được thiết kế khá hay, code gọn, tất cả method đều rất ngắn, dễ hiểu.

Do là built-in nên ta cũng chả cần cài cắm gì thêm mệt người. Nếu đã upgrade lên Rails 6, bạn hãy thử trải nghiệm nó xem.

Còn đối với phiên bản thấp hơn, ta cũng có thể áp dụng flow của Action Text để build một package hỗ trợ richtext.

· 11 min read
Lê Sĩ Bích

Ngày nay, công nghệ ngày càng phát triển, và thế giới Web cũng vậy. Đa số web hiện đại đều đã nói lời tạm biệt với những dòng Ruby, PHP, hay Java được nhúng trong HTML/JS. Phần giao diện người dùng được chính browser phía client xử lý, thay vì server ôm hết như xưa. Các thư viện/framework như React, Angular, Vue, ... đều đã trở nên quá quen thuộc.

Nếu bạn có ý định học hay đã chuyển sang React thì mong bài viết có thể giúp các bạn có những mindset tốt hơn khi làm việc với nó.

Đây đều là những thứ mình cho rằng cần quan tâm sau 1 thời gian làm việc với React.

Bài viết này không nói về việc hướng dẫn code React.

Component

React is all about components

React được design theo hướng Component, mỗi phần tử nhỏ nhất như thẻ <span>, hay <button> đều có thể wrap thành một component để tái sử dụng 1 cách tối đa.

// path/to/button.jsx
export function Button({ children, type, onClick }) {
return (
<button type="button" className={`btn btn-${type}`} onClick={onClick}>
{children}
</button>
);
}

Và ở đâu cần component này, ta sẽ import nó vào để sử dụng.

import { Button } from "./path/to/button";

function Screen() {
return (
<Button type="primary" onClick={() => console.log("Clicked")}>
Click me
</Button>
);
}

Với những ngôn ngữ server side truyền thống, ta sẽ viết như sau (slim ruby):

/ path/to/a.slim
button.btn.btn-primary
| Button A
/ path/to/b.slim
button.btn.btn-primary
| Button B

Có thể thấy là code của ta trông sáng sủa hơn rất nhiều.

Trên thực tế, ta cũng nên viết những component nhỏ nhất có thể như vậy, nó sẽ giúp giao diện app ta đồng bộ, và debug cũng trở nên dễ hơn.

Hay thử với một component phức tạp hơn hơn xíu:

function List({ items, renderItem, emptyText }) {
if (items.length === 0) {
return (
<div>
<span>{emptyText}</span>
</div>
);
}

return <div>{items.map((item) => renderItem(item))}</div>;
}

Cấu trúc thư mục

Đối với những dự án lớn, có một cấu trúc thư mục rõ ràng sẽ khiến việc code trở nên dễ chịu hơn nhiều.

Lại quay lại các ngôn ngữ server side MVC cũ - Rails. Đây là một cấu trúc khó mà có thể thay đổi trong tất cả các dự án:

Dù với sự hỗ trợ của các Editor/IDE hiện đại trong việc tìm kiếm, mở file, thì cũng khá mất thời gian để có thể tìm được những file liên quan.

Với React thì flexible hơn, bạn có thể tổ chức theo kiểu trên (VD cho 1 project dùng Redux)

Nhưng với mình thì mình thích cách tổ chức theo component/màn hình hơn.

Mình học được cấu trúc trên từ một dự án trong list awesome react native - Gitpoint, dù nó được viết bằng React Native nhưng bản chất vẫn là React nên không có vấn đề gì hết.

Tuy nhiên cấu trúc này gặp 1 nhược điểm ở chỗ nếu 2 màn hình mà share nhau chung 1 state (redux) thì sẽ gây bối rối, hoặc là lặp code. Với mình, mình chọn giải pháp tạo 1 thư mục shared, rồi cũng tổ chức file giống cấu trúc của thư mục screens. Còn không thì chấp nhận việc code bị lặp 1 chút.

Functional Programming (FP)

Nếu như Ruby, Java là các ngôn ngữ lập trình hướng đối tượng (OOP) thì Javascript lại mang phong cách lập trình hàm, mặc dù vẫn có class, object nếu bạn muốn dùng (Prototype)

Với OOP, ta thường xuyên thay đổi trạng thái (các biến instance) của object, nhưng FP lại không thích điều này, mà thường hướng tới tính bất biến (Immutability) và pure function. Ta hãy cũng tìm hiểu thêm về chúng

Pure Functions

Lấy ví dụ với việc cộng 2 số tự nhiên

const z = 10;
const add = (x, y) => x + y;
add(1, 2); // 3
add(1, 3); // 4

Hàm add nhận 2 tham số xy, nó chỉ sử dụng 2 tham số đầu vào này để thực hiện phép tính, mà không sử dụng/làm thay đổi các biến ngoài phạm vi hàm.

Hơn nữa nó luôn trả về cùng 1 giá trị nếu như tham số đầu vào không thay đổi.

Còn xem hàm dưới đây

const bonus = 5;
const add = (x, y) => x + y + bonus;
add(1, 2); // 3
add(1, 2); // 3

Dù luôn trả về một giá trị với cùng tham số, tuy nhiên hàm lại phụ thuộc vào biến bonus (external variable) nên đây được xem là 1 impure function.

Ngoài ra impure function cũng gây ra các side effects như các hàm sau:

  • Gọi HTTP request
  • Ghi dữ liệu
  • Math.random(), new Date()
  • ....

Giá trị trả về của chúng không phải lúc nào cũng giống nhau, điều đó khiến kết quả của hàm khó mà lường trước được, khi test ta thường phải mock 1 giá trị cố định.

Pure function sẽ giúp app chúng ta ít lỗi hơn, ngoài ra cũng dễ dàng test hơn.

Trong React, nói đến pure function ta thường nghĩ đến stateless component - Functional Component, nó sẽ chỉ sử dụng props để tính toán và render dựa trên những props đó. Tuy nhiên những update gần đây đã thêm Hook, nó làm cho Functional Component cũng có thể có state. Cá nhân mình không thích cái Hook này lắm.

Nhưng app của ta không chỉ toàn pure function được, sẽ phải có những hàm gọi API, thay đổi state, lấy state để tính toán, lưu dữ liệu vào localStorage, ... nhưng hãy cố gắng giảm thiểu số lượng side effects xuống thấp nhất có thể.

Immutability

Một điều quan trọng nữa là tính bất biến.

Functional programming nói chung và React nói riêng, ta thường tránh việc sửa trực tiếp 1 biến nào đó, hay state. Thay vào đó, ta sẽ tạo 1 biến mới.

const person = {
age: 12,
};
person.name = "Name";

let array = [1, 2, 3];
array.push(4);

Nếu trong dự án của bạn có những dòng code như trên, thì code bạn đã mất tính bất biến. Thay vì trực tiếp chỉnh sửa 1 biến như vậy. Ta nên tạo 1 biến mới với những giá trị cũ, sau đó thêm giá trị mới vào.

const updatedPerson = {
age: person.age,
name: "Name",
};
// hay
const updatedPerson = {
...person,
name: "Name",
};

Dễ dàng nhận thấy updatedPerson.age vẫn tham chiếu đến giá trị cũ của person.name, tuy nhiên ta sử dụng biến updatedPerson này thế nào đi nữa, thì cũng sẽ không ảnh hưởng đến giá trị của person

Nhưng tại sao lại phải làm vậy? Thử xét 1 vòng lặp đơn giản như:

let s = 0;
let index = 0;
for (index = 0; index < data.length; index++) {
s += data[index];
}

Giả sử đang trong quá trình lặp, thi data[n] bị thay đổi, chẳng phải s += data[index] sẽ sai luôn hay sao.

Còn trong React, ta có React.PureComponent nó sẽ shallow compare props và state để quyết định xem có update component hay không.

export class SampleComponent extends React.PureComponent {
state = {
filter: {
name: "A name",
age: 21,
},
};

// shouldComponentUpdate(nextProps, nextState) {
// return shallowCompare(this, nextProps, nextState)
// }

handleClick = () => (this.state.filter.name = "New name");

render() {
return (
<div>
<h3>{this.state.filter.name}</h3>
<button onClick={this.handleClick}>Click me</button>
</div>
);
}
}

React.PureComponent đã định nghĩa sẵn cho ta phương thức shouldComponentUpdate như phần mình comment.

Hàm shallowCompare chỉ đơn thuần lặp tất cả các key có trong props và state, so sánh với state/props cũ.

Nó sẽ thực hiện việc so sánh currentState.filter === nextState.filter (so sánh bằng tham chiếu).

Việc này có lợi hơn rất nhiều so với việc deep compare tất cả các giá trị trong filter (cả về thời gian lẫn độ phức tạp).

Tuy nhiên, khi chúng ta trực tiếp chỉnh sửa this.state.filter.name = 'New name', sẽ khiến filter không hề thay đổi về tham chiếu. Khi đó:

currentState.filter === nextState.filter; // true
currentState.filter.name === nextState.filter.name; // false

SampleComponent của ta cũng sẽ không re-render, cho dù bạn có click đến sang năm.

Thay vào đó ta sẽ làm như sau

handleClick = () => {
this.setState({ filter: { ...this.state.filter, name: "New name" } });
};

Ta copy toàn bộ tham chiếu các attribute của state.filter cũ sang 1 object mới, và sau đó thay đổi biến name của object mới này, ta không hề làm thay đổi state.filter cũ.

Khi đó currentState.filter === nextState.filter sẽ trả về false. SampleComponent của ta được re-render lại. Và nếu có action nào không làm thay đổi state, component của ta cũng sẽ không re-render. Vậy là cả React và ta đều happy - một người khỏe, 2 người vui :v

Higher-Order Functions (HOF)

HOF nhận tham số là hàm, hoặc trả về một hàm khác, hoặc là cả 2.

VD 1 hàm nhận tham số hàm:

const name = "React";
const phoneNumber = "0969696969";
const numberValidator = (str) => str.match(/\d+/g);
const validate = (value, validator) => !!validator(value);

validate(name, numberValidator); // false
validate(phoneNumber, numberValidator); // false

Hay 1 hàm trả về 1 hàm:

function makeAdder(constantValue) {
return function adder(value) {
return constantValue + value;
};
}

ta gọi hàm này như sau: makeAdder(10)(20)

Thoạt nhìn có vẻ sợ, nhưng nếu viết minh bạch ra

const add10 = makeAdder(10);
add10(20); // 30

Mọi thứ trở nên rõ ràng hơn nhiều, makerAdder(10) trả về một hàm, sau đó ta gọi hàm này với tham số là 20

const add10 = makeAdder(10);
// add10 = function adder(value) {
// return 10 + value
// }
add10(20);

Trong React, ta cũng thường xuyên áp dụng kỹ thuật này, tuy nhiên ngoài HOF, thì ta còn có Higher-Order Component (HOC), nhằm chỉ những hàm nhận vào tham số là 1 Component và trả về 1 Component khác.

VD:

function protectRoute(Component, requiredRole) {
return function ProtectedRoute(props) {
const currentRole = localStorage.getItem("role");
if (currentRole < requiredRole) {
return <Redirect to="/sign_in" />;
}
return <Component {...props} />;
};
}

Declarative Programming

Ta có 2 thiên hướng lập trình đối lập nhau, đó là:

  • Imperative Programming: mô tả control flow của việc cần làm
  • Declarative Programming: chỉ viết ra những gì cần làm mà không mô tả rõ control flow của từng bước.

VD tiêu biểu đó là 1 vòng lặp cơ bản:

Style Imperative:

const arr = [1, 2];
const newArr = [];
for (let i = 0; i < arr.length; i += 1) {
newArr.push(arr[i] + 1);
}
console.log(newArr); // [2, 3]

Với style này, bạn nêu lần lượt từng bước code bạn thực hiện như thế nào, ta phải đi sâu vào implementation hơn.

Trong khi đó với Declarative:

const arr = [1, 2];
const newArr = arr.map((element) => element + 1); // [2, 3]

Ta sẽ chỉ nói rằng ta cần 1 mảng mới từ arr, mà mỗi phần tử của nó tăng lên 1. Code của ta vừa dễ hiểu và vừa đẹp hơn.

Một số ngôn ngữ tiêu biểu:

  • Imperative: C/C++, Java, ...
  • Declarative: SQL, HTML, ...
  • Tạp phế lù: Javascript =)), ...

Ở trên là những gì mình search được trên google khi bắt đầu tìm hiểu về Declarative Programming. Tuy nhiên, vẫn khá là khó hiểu, và khó phân biệt giữa 2 thằng Imperative và Declarative

Tuy nhiên khi đọc được comment này, mọi thứ đã trở nên sáng sủa hơn nhiều. Mình coi nó là 1 lớp abstract, mà khi gọi hàm đó, ta chỉ cần quan tâm đến what to do mà không phải nghĩ xem how to do.

Hãy sử dụng các hàm có sẵn của javascript như: .map, .reduce, .filter, ... và bạn sẽ nhận thấy được vẻ đẹp của Declarative Programming.

Quay trở lại với React, vậy thì tính Declarative của nó ở đâu?

Chính bản thân các component React đã rất 'declarative' rồi.

Hãy đọc phần description của React trên Github

A declarative, efficient, and flexible JavaScript library for building user interfaces.

Thử so sánh 2 đoạn mã sau:

// jQuery
$(".like").click(function () {
const $btn = $(this);
if ($btn.hasClass("liked")) {
$btn.removeClass("liked");
} else {
$btn.addClass("liked");
}
});
// React
class LikeButton extends React.Component {
// ...codes
render() {
if (this.state.liked) {
return <HighlightButton>Like</HighlightButton>;
}
return <Button>Like</Button>;
}
}

Với jQuery, ta phải mô tả chính xác code ta cần làm gì.

Trong khi đó với React: Tiểu nhị, like rồi thì cho cái HightlightButton ra đây, không thì Button thường thôi.

Ta sẽ quan tâm đến việc component cần hiển thị cái gì tương ứng với mỗi (props/state) của nó.

Link tham khảo

https://github.com/facebook/react

https://github.com/jondot/awesome-react-native

https://github.com/gitpoint/git-point

https://medium.freecodecamp.org/all-the-fundamental-react-js-concepts-jammed-into-this-single-medium-article-c83f9b53eac2?gi=7fb0830efbd4

https://medium.com/@cscalfani/so-you-want-to-be-a-functional-programmer-part-1-1f15e387e536

https://www.miles.no/blogg/tema/teknisk/why-care-about-functional-programming-part-1-immutability

https://blog.logrocket.com/immutability-in-react-ebe55253a1cc

https://stackoverflow.com/questions/1784664/what-is-the-difference-between-declarative-and-imperative-programming#comment29365241_1784702