3 posts tagged with "ruby-on-rails"

View All Tags

· 11 min read
Lê Sĩ Bích

1. Mở đầu

Chắc hẳn Puma không phải một cái tên xa lạ đối với mỗi Rails developer, một phần cũng vì đây là appserver mặc định khi tạo mới một project Rails.

Hãy cùng nhìn qua những config cơ bản khi chạy 1 ứng dụng Rails với Puma server. link

max_threads_count = ENV.fetch("RAILS_MAX_THREADS") { 5 }
min_threads_count = ENV.fetch("RAILS_MIN_THREADS") { max_threads_count }
threads min_threads_count, max_threads_count

worker_timeout 3600 if ENV.fetch("RAILS_ENV", "development") == "development"

port ENV.fetch("PORT") { 3000 }

environment ENV.fetch("RAILS_ENV") { "development" }

pidfile ENV.fetch("PIDFILE") { "tmp/pids/server.pid" }

workers ENV.fetch("WEB_CONCURRENCY") { 2 }

preload_app!

plugin :tmp_restart

Đối với những người mới bắt đầu, khi deploy puma, có lẽ sẽ từ chối hiểu đống config trên và set một số biến môi trường như sau:

  • WEB_CONCURRENCY: bằng với số lượng vcore/process của máy
  • RAILS_MAX_THREADS: ờ thì nhiều RAM thì set 16, 32 cho oách, không thì thôi dùng mặc định 5 và mặc do dòng đời xô đẩy :v

Hãy cùng tìm hiểu thêm về Puma để góp phần làm chủ từng dòng code trong app của chúng ta.

2. Multi-processing và Multi-threading

2.1. Puma dùng loại nào?

  • Khi chạy 1 Rails app mới tạo, hãy để ý lúc boot server, bạn sẽ thấy:
Puma starting in single mode...
* Puma version: 5.3.1 (ruby 3.0.1-p64) ("Sweetnighter")
* Min threads: 5
* Max threads: 5
* Environment: development
* PID: 1
* Listening on http://0.0.0.0:3000
Use Ctrl-C to stop

Đây là dấu hiệu cho ta thấy, Rails đang chạy ở chế độ single process (1 process), và multi-thread (cụ thể là 5 thread)

  • Còn khi config deploy, có thể bạn sẽ được 1 người có kinh nghiệm hơn bảo rằng "Bỏ comment cái dòng workers ENV.fetch("WEB_CONCURRENCY") { 2 } đi em êi"

Và đây là kết quả khi ta làm như vậy

[1] Puma starting in cluster mode...
[1] * Puma version: 5.3.1 (ruby 3.0.1-p64) ("Sweetnighter")
[1] * Min threads: 5
[1] * Max threads: 5
[1] * Environment: development
[1] * Master PID: 1
[1] * Workers: 2
[1] * Restarts: (���) hot (���) phased
[1] * Preloading application
[1] * Listening on htp://0.0.0.0:3000
[1] Use Ctrl-C to stop
[1] - Worker 0 (PID: 16) booted in 0.02s, phase: 0
[1] - Worker 1 (PID: 17) booted in 0.05s, phase: 0

Puma đang chạy đồng thời multi-process (2 process) và multi-thread (5 thread)

Multi-process, multi-thread là cái của nợ gì vậy?

Chúng ta sẽ tìm hiểu về nó ngay sau đây. Tuy nhiên chúng ta sẽ focus vào cluster mode của Puma nhé.

2.2. Multi-threading

Trước tiên ta hãy nhớ lại định nghĩa về process - tiến trình, mỗi khi ta chạy 1 command nào đó (ví dụ như ruby xxx.rb hay bật chrome chẳng hạn), OS sẽ tạo 1 process để xử lý command của ta.

Mỗi process có thể tạo ra nhiều thread để xử lý task (ví dụ mỗi tab chrome được handle bởi 1 thread). Các thread được tạo bởi 1 process sẽ share nhau 1 vùng nhớ (memory), trong shared memory này, mỗi thread sẽ có stack, register (google để biết thêm đống này là gì =)) ) riêng của mình. Tuy nhiên, việc chung đụng memory như trên sẽ dẫn đến 1 vấn đề là nhiều thread cùng chọc tới 1 resource nào đó, dẫn tới conflict về data, hay còn được biết đến với cái tên nguy hiểm hơn là race condition. Code của ta sẽ cần thread-safe (các bạn có thể google thêm :v)

Đối với ứng dụng Ruby thì khi chạy ở môi trường MRI... À đấy lại nhắc tới MRI, chắc nhiều người sẽ thắc mắc liệu đó là gì. Đây là tên của 1 Ruby Runtime. Ruby 1 chuẩn spec, implement kiểu gì cũng được, miễn là đáp ứng được spec đó thì đều là Ruby. Có thể kể đến các Runtime phổ biến sau

  • MRI - aka CRuby: Matz’s Ruby Interpreter (Matz - hay Matsumoto Yukihiro) là người tạo ra runtime này, được viết bằng C, nên còn gọi là CRuby

    Đa số là dùng MRI

  • JRuby: Ruby implement bằng Java

  • Rubinius

  • mruby

  • ...

MRI có 1 cơ chế là Global Interpreter Lock (GIL), khi chạy multi-thread, nó chỉ cho phép 1 thread chạy source code Ruby tại 1 thời điểm, nên là ta có nhiều thread đi chăng nữa thì cũng chỉ có 1 thread được chạy mà thôi.

Tuy nhiên với các thao tác IO như đọc DB, request external resource, đọc ghi file, ... thì GIL không block. Puma đã tận dụng điều này, khi 1 thread đang xử lý IO, nó sẽ quay trở lại xử lý ở process, nhận thêm các request khác để xử lý.

Chính vì vậy, ngay cả khi chỉ chạy ở single mode, Puma vẫn có thể handle được concurrent request. Tuy nhiên với các request cần thời gian dài để xử lý, do chỉ có 1 thread được chạy, nên request sau sẽ phải chờ request trước xử lý xong, dẫn đến Puma bị thọt trong trường hợp này.

Ta có thể kiểm tra về trạng thái các thread của Puma bằng đoạn code sau:

class HomesController < ApplicationController
def show
Thread.list.select { |t| t.name&.match?(/puma threadpool \d+/) }.each do |t|
Rails.logger.info("Thread #{t.name}: #{t.status}, alive: #{t.alive?}, current: #{t == Thread.current}")
end
head :ok
end
end

Vì sao lại là /puma threadpool \d+/? Các bạn có thể xem tại đây.

Rails.application.routes.draw do
resource :home
end
max_threads_count = ENV.fetch('RAILS_MAX_THREADS', 5)
min_threads_count = ENV.fetch('RAILS_MIN_THREADS') { max_threads_count }
threads min_threads_count, max_threads_count
worker_timeout 3600 if ENV.fetch('RAILS_ENV', 'development') == 'development'
port ENV.fetch('PORT', 3000)
environment ENV.fetch('RAILS_ENV', 'development')
pidfile ENV.fetch('PIDFILE', 'tmp/pids/server.pid')
plugin :tmp_restart
curl http://localhost:3000/home
tail -n 50 log/development.log

Và đây là output:

Thread puma threadpool 001: sleep, alive: true, current: false
Thread puma threadpool 002: sleep, alive: true, current: false
Thread puma threadpool 003: sleep, alive: true, current: false
Thread puma threadpool 004: sleep, alive: true, current: false
Thread puma threadpool 005: run, alive: true, current: true

Đó chính là 5 thread của chúng ta, như ví dụ là thread 5 đang tiến hành xử lý request, còn những thread khác nếu rảnh nó sẽ ở trạng thái sleep. Ở đây có 1 điểm đáng chú ý là sau khi kết thúc request, thread không bị kill mà chỉ về trạng thái sleep, do vậy nếu ta tuỳ tiện modify biến global, nó sẽ ảnh hưởng tới request tiếp theo mà thread đó handle.

Ví dụ:

before_action :set_locale

def set_locale
I18n.locale = params[:locale] || I18n.default_locale
end

Không cần biết code cái gì, nhưng modify 1 biến global tại runtime như trên là đã thấy nguy hiểm rồi. Và ta hãy tiến hành test xem

class HomesController < ApplicationController
def show
Thread.current.tap { |t| Rails.logger.info("Current thread #{t.name}: #{t.status}, alive: #{t.alive?}") }
Rails.logger.info("Before: #{I18n.locale}")
I18n.locale = params[:locale]
Rails.logger.info("After: #{I18n.locale}")
head :ok
end
end

rồi sau đó spam khoảng chục cái request

curl http://localhost:3000/home?locale=vi

và ta sẽ thấy kết quả như sau

Current thread puma threadpool 003: run, alive: true
Before: en
After: vi

Current thread puma threadpool 003: run, alive: true
Before: vi
After: vi

Có thể dễ dàng nhận ra rằng việc set I18n.locale = "vi" ở request trước đã bị leak sang request sau. Nếu ở tất cả các request, trước khi xử lý ta đều set I18n.locale thì việc leak trên sẽ ít ảnh hưởng hơn.

Tuy nhiên hãy thử tưởng tượng khi app của bạn có chứa cả code admin và api, bên admin có thể đổi ngôn ngữ, còn api thì không, thì kết quả sẽ ra sao. Khi admin đổi ngôn ngữ, tình cờ, 1 user vô phúc nào đó request tới trúng cái thread vừa handle việc admin đổi ngôn ngữ, và API sẽ trả về locale của ông admin kia :v

Chính vì vậy, ở docs của Rails cũng có recommend chúng ta xử lý chuyển locale bằng I18n.with_locale, các bạn có thể xem tại đây

around_action :switch_locale

def switch_locale(&action)
locale = params[:locale] || I18n.default_locale
I18n.with_locale(locale, &action)
end

Túm váy lại là multi-threading hỗ trợ concurrent rất tốt, tuy nhiên cũng ẩn chứa 1 vài vấn đề. Nên sẽ cần chú ý hơn khi code.

2.3. Multi-processing

Máy tính hiện nay đa số đều có khá nhiều core, và đều hỗ trợ đa nhiệm để tối ưu hoá việc xử lý song song. Vậy với webserver thì sao? Có cần chứ, multi-processing giúp ta có thể xử lý thêm nhiều request đồng thời hơn nữa. Trừ khi server của ta quá yếu, chứ không thì tội gì, nhà chả có gì ngoài core mà lại chạy đơn nhân thì phí của giời quá :v

Mặc định Puma sẽ chạy ở single mode, khi đó chỉ có 1 process, process này sẽ đảm nhận hết từ việc lưu code của app, tiếp nhận request, ... sau đó sẽ đẩy request sang cho các thread xử lý như đã mô tả ở trên.

Còn đối với cluster mode, trước hết Puma sẽ tạo ra một master process. Từ process này, dựa vào giá trị của config dưới, Puma sẽ fork để tạo ra số process tương ứng, hay còn gọi là worker.

workers ENV.fetch("WEB_CONCURRENCY") { 2 }

Lại nói về fork, đây là quá trình mà 1 process tạo ra 1 process mới, gọi là child process. Mỗi child process đều có process id (PID) riêng biệt, và một môi trường riêng tách biệt hoàn toàn với parent process (source code, memory, stack, ...). Không như thread vẫn share code với process, nhưng có stack, register riêng. Do vậy, có thể nói forking an toàn và bảo mật hơn so với multi-thread.

Quay trở lại với Puma, ở cluster mode, master process chỉ đảm nhận việc tiếp nhận request, sau đó sẽ bắn sang các worker để chúng tự xử với các thread mà chúng spawn. Các worker của Puma đều có 1 bản copy source code app riêng, nên khi chạy nhiều worker, hãy chắc chắn là server của bạn có đủ RAM :v

Ở Ruby, có thể kiểm tra xem app của ta đang chạy ở process nào bằng cách sử dụng

Process.pid  # Current child process
Process.ppid # Parent process

Hãy thử ở app Rails của ta xem

class HomesController < ApplicationController
def show
Rails.logger.info("Current: #{Process.pid}. Parent: #{Process.ppid}")
head :ok
end
end
# ...
workers 2
Processing by HomesController#show as */*
Current: 128. Parent: 1

Processing by HomesController#show as */*
Current: 129. Parent: 1
ps aux
# USER PID %CPU %MEM VSZ RSS TTY STAT START TIME COMMAND
# root 1 0.5 7.1 236000 145864 pts/0 Ssl+ 03:28 0:04 puma 5.3.1 (tcp://0.0.0.0:3000) [app]
# root 7 0.0 0.1 3544 3192 pts/1 Ss 03:29 0:00 zsh
# root 128 0.0 6.9 288680 142008 pts/0 Sl+ 03:29 0:00 puma: cluster worker 0: 1 [app]
# root 129 0.0 6.9 288720 142116 pts/0 Sl+ 03:29 0:00 puma: cluster worker 1: 1 [app]
# root 219 0.0 0.0 1640 856 pts/1 R+ 03:40 0:00 ps aux

3. Kết luận

Cả multi-threading và multi-processing đều quan trọng, chúng góp phần giúp app ta xử lý đc concurrent request. Hy vọng bài viết có thể giúp ích cho các bạn ít nhiều.

Ngoài ra, về vấn đề set số worker và thread ở phần đầu đã nói, tốt nhất chắc vẫn là:

  • WEB_CONCURRENCY = vcore, ngoài ra còn phụ thuộc vào RAM nữa
  • RAILS_MAX_THREADS không có con số cụ thể, phụ thuộc vào RAM và CPU, nhiều RAM, CPU khoẻ thì set được càng nhiều, nhưng cũng khá là hên xui, phải tiến hành test rồi mới căn chỉnh con số phù hợp được =))

Nếu có sai sót gì các bạn cứ gạch đá thoải mái à :v chi tiết có thể tham khảo ở đây

4. Tham khảo

· 11 min read
Lê Sĩ Bích

Rails 6 đã bước vào giai đoạn beta với phiên bản v6.0.0.rc1. RC là viết tắt của Release Candidate, đây là phiên bản mà có xác suất trở thành final release rất cao. Ta có thể áp dụng nó vào dự án ngay kể từ bây giờ mà không cần lo sợ có những breaking change.

Nếu bạn sử dụng Docker, mình khuyên nên sử dụng ruby 2.6.3, vì trước đây mình đã dùng thử ruby:2.7.0-preview1-alpine3.10 thì khá nhiều lỗi khi up server, mà chả biết phải fix sao :sad:

Ở Rails 6, có khá nhiều tính năng mới hay ho:

  • Action Text
  • Parallel Testing
  • Action Model custom error message format.
  • vân vân mây mây...

Ở bài này, mình sẽ chỉ tập trung đề cập tới Action Text. Đây là một package giúp ta xây dựng WYSIWYG editor một cách nhanh chóng, hơn nữa, việc upload cũng được integrate với Active Storage.

Chú ý: Bài khá dài và embed nhiều code :v

Cách dùng

Cài đặt và sử dụng

Vì là Rails nên cách sử dụng rất đơn giản, nhưng ta sẽ chả biết nó chạy cái gì đằng sau cả =))

Cài đặt Action Text bằng CLI command sau:

rails action_text:install

Nhớ hãy chạy thêm cả command install Active Storage nữa.

rails active_storage:install

Để áp dụng cho field content của model Post, ta sẽ dùng tới macro has_rich_text

class CreatePosts < ActiveRecord::Migration[6.0]
def change
create_table :posts do |t|
t.string :content
t.string :category

t.timestamps
end
end
end

content ở đây mình dùng string, nhưng khuyến khích dùng text hơn.

class Post < ApplicationRecord
has_rich_text :content
end

Trên form, ta chỉ việc dùng rich_text_area

<%= form_with(model: @post) do |form| %>
<div class="field">
<%= form.label :content %>
<%= form.rich_text_area :content %>
</div>
<% end %>

Khi permit params, ta cũng làm như bao field khác


class PostsController < ApplicationController
def post_params
params.require(:post).permit(:category, :content)
end
end

Cuối cùng ta hiển thị dữ liệu như sau:

<%= @post.content %>

Câu lệnh trên thực chất đang ngầm gọi tới @post.content.to_s

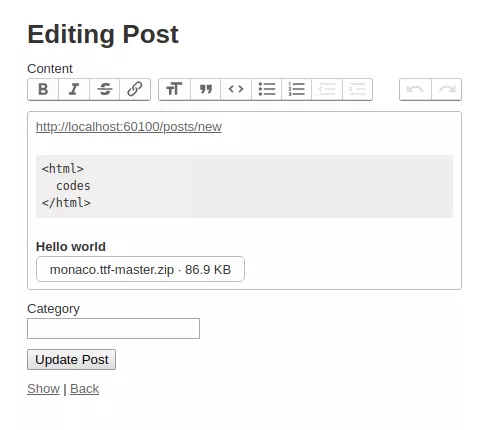
Đây là sản phẩm của ta:

Form tạo post với WYSIWYG editor - Sử dụng Trix editor, do Basecamp phát triển, cây nhà lá vườn luôn.

Có thể kéo thả file vào, file đó sẽ được upload bằng Active Storage.

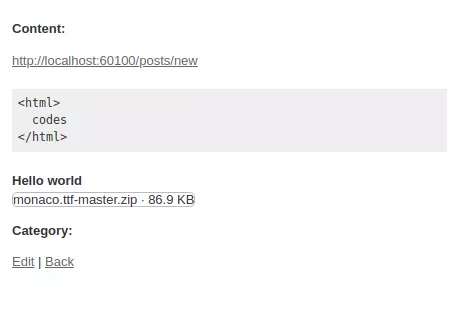
Hiển thị dữ liệu ở màn hình detail

Các bạn thấy sao? Cá nhân mình thấy xấu như cờ hó vậy =)) Tuy nhiên ta có thể styling cho nó.

Styling

Rails đang có sẵn một vài style cơ bản cho nó trong file app/assets/stylesheets/actiontext.scss, ta có thể sửa nó để cho đẹp hơn.

Với đống tool của editor thì có thể dùng selector .trix-button-row

Với template attachment (như cái monaco.ttf ở trên), ta cũng có thể custom lại, Rails cung cấp sẵn template mặc định ở file app/views/active_storage/blobs/_blob.html.erb

Tìm hiểu sự ma giáo

Rồi ta đã lướt qua cách sử dụng nó, nhưng mà có quá nhiều magic.

Liệu bạn có tự đặt ra những câu hỏi thế này hay không?

  • Không biết cách lưu trữ dữ liệu của nó như thế nào?

  • Làm sao mà cái file trong kia integrate được với Active Storage?

  • Vì sao lại có thể custom lại những attachment bằng template?

  • vân vân mây mây...

Ta sẽ bắt tay vào tìm hiểu nó.

Hãy bắt đầu với has_rich_text

Macro has_rich_text

# https://github.com/rails/rails/blob/6a5c8b91998c56e50b5cc934d968947cd319f735/actiontext/lib/action_text/attribute.rb#L26
def has_rich_text(name)
class_eval <<-CODE, __FILE__, __LINE__ + 1
def #{name}
rich_text_#{name} || build_rich_text_#{name}
end

def #{name}=(body)
self.#{name}.body = body
end
CODE

has_one :"rich_text_#{name}", -> { where(name: name) },
class_name: "ActionText::RichText", as: :record, inverse_of: :record, autosave: true, dependent: :destroy
# ... codes
end

Dễ dàng thấy rằng đây là 1 macro giúp định nghĩa getter, setter, và cả association has_one :rich_text_... với ActionText::RichText.

Vậy thì khi ta gọi @post.content, thực chất là ta đang gọi tới @post.rich_text_content.

Và nó cũng chỉ ra 1 điều nữa là Rails dùng 1 bảng riêng để lưu lại đống rich text của ta.

Hãy dành chút thời gian nhìn vào thư mục db/migrate, ta sẽ thấy file sau:

# db/migrate/20190718085159_create_action_text_tables.action_text.rb
# This migration comes from action_text (originally 20180528164100)
class CreateActionTextTables < ActiveRecord::Migration[6.0]
def change
create_table :action_text_rich_texts do |t|
t.string :name, null: false
t.text :body, size: :long
t.references :record, null: false, polymorphic: true, index: false

t.timestamps

t.index [ :record_type, :record_id, :name ], name: "index_action_text_rich_texts_uniqueness", unique: true
end
end
end

Quả thật là vậy, body chính là nơi lưu trữ đống text của ta, còn name, record_id, và record_type là những attribute cho polymorphic association, khá quen thuộc nếu bạn đã dùng Active storage

Ta sẽ đi đến bước tiếp theo rich_text_area

Rails xử lý, lưu trữ rich text như thế nào?

# https://github.com/rails/rails/blob/cc1a5d5620c4cd952b27f6c1bbd16d8780a34d0e/actiontext/app/helpers/action_text/tag_helper.rb#L20
def rich_text_area_tag(name, value = nil, options = {})
options = options.symbolize_keys

options[:input] ||= "trix_input_#{ActionText::TagHelper.id += 1}"
options[:class] ||= "trix-content"

options[:data] ||= {}
options[:data][:direct_upload_url] = main_app.rails_direct_uploads_url
options[:data][:blob_url_template] = main_app.rails_service_blob_url(":signed_id", ":filename")

editor_tag = content_tag("trix-editor", "", options)
input_tag = hidden_field_tag(name, value, id: options[:input])

input_tag + editor_tag
end

Có thể thấy đơn giản nó chỉ init cái trix editor cho ta thôi.

Việc kéo thả file, upload hoàn toàn được handle bởi trix editor, ta không custom được template sau khi file upload thành công.

Tuy nhiên Action Text có thêm 1 callback sau khi file được upload thành công:

// https://github.com/rails/rails/blob/cc1a5d5620c4cd952b27f6c1bbd16d8780a34d0e/actiontext/app/javascript/actiontext/attachment_upload.js#L26
this.attachment.setAttributes({
sgid: attributes.attachable_sgid,
url: this.createBlobUrl(attributes.signed_id, attributes.filename),
});

đây là 1 step rất quan trọng, nhưng ta sẽ chưa cần chú ý tới nó vội. Attachment của ta sau khi upload thành công sẽ trông như sau:

<figure
contenteditable="false"
data-trix-attachment='{"contentType":"application/zip","filename":"monaco.ttf-master.zip","filesize":88996,"sgid":"BAh7CEkiCGdpZAY6BkVUSSIvZ2lkOi8vYXBwL0FjdGl2ZVN0b3JhZ2U6OkJsb2IvOD9leHBpcmVzX2luBjsAVEkiDHB1cnBvc2UGOwBUSSIPYXR0YWNoYWJsZQY7AFRJIg9leHBpcmVzX2F0BjsAVDA=--79d2aa5a0af367233a5420a4f0ae02657d3910ab","url":"http://localhost:60100/rails/active_storage/blobs/eyJfcmFpbHMiOnsibWVzc2FnZSI6IkJBaHBEUT09IiwiZXhwIjpudWxsLCJwdXIiOiJibG9iX2lkIn19--e79bebbfa0f10319d319411c129291d12e752d22/monaco.ttf-master.zip"}'
data-trix-content-type="application/zip"
data-trix-id="1108"
class="attachment attachment--file attachment--zip"
>
<figcaption class="attachment__caption">
<span class="attachment__name">monaco.ttf-master.zip</span>
<span class="attachment__size">86.91 KB</span>
</figcaption>
</figure>

Tiếp đến là submit dữ liệu, vậy Rails sẽ gửi gì lên?

Đơn giản là Rails sẽ gửi tất cả những gì bên trong <trix-editor></trix-editor>

Inspect thử params, ta sẽ thấy:

post_params[:content]
# => "<div><a href=\"http://localhost:60100/posts/new\">http://localhost:60100/posts/new</a></div><div><strong>Hello world<br></strong><figure data-trix-attachment=\"{&quot;content&quot;:&quot;<figure class=\\&quot;attachment attachment--file attachment--zip\\&quot;>\\n\\n <figcaption class=\\&quot;attachment__caption\\&quot;>\\n <span class=\\&quot;attachment__name\\&quot;>monaco.ttf-master.zip</span>\\n <span class=\\&quot;attachment__size\\&quot;>86.9 KB</span>\\n </figcaption>\\n</figure>\\n&quot;,&quot;contentType&quot;:&quot;application/zip&quot;,&quot;filename&quot;:&quot;monaco.ttf-master.zip&quot;,&quot;filesize&quot;:88996,&quot;sgid&quot;:&quot;BAh7CEkiCGdpZAY6BkVUSSIvZ2lkOi8vYXBwL0FjdGl2ZVN0b3JhZ2U6OkJsb2IvNz9leHBpcmVzX2luBjsAVEkiDHB1cnBvc2UGOwBUSSIPYXR0YWNoYWJsZQY7AFRJIg9leHBpcmVzX2F0BjsAVDA=--97b885c24fd3d87464525f34a7b6ea117e4c72e6&quot;,&quot;url&quot;:&quot;http://localhost:60100/rails/active_storage/blobs/eyJfcmFpbHMiOnsibWVzc2FnZSI6IkJBaHBEQT09IiwiZXhwIjpudWxsLCJwdXIiOiJibG9iX2lkIn19--940badfc5aee704ef3f98085f87f909baf870660/monaco.ttf-master.zip&quot;}\" data-trix-content-type=\"application/zip\" class=\"attachment attachment--content attachment--zip\"><figure class=\"attachment attachment--file attachment--zip\">\r\n\r\n <figcaption class=\"attachment__caption\">\r\n <span class=\"attachment__name\">monaco.ttf-master.zip</span>\r\n <span class=\"attachment__size\">86.9 KB</span>\r\n </figcaption>\r\n</figure>\r\n<figcaption class=\"attachment__caption\"></figcaption></figure></div>"

Làm đẹp nó chút

<div>
<a href="http://localhost:60100/posts/new"
>http://localhost:60100/posts/new</a
>
</div>
<div>
<strong>Hello world<br /></strong>
<figure
data-trix-attachment="..."
data-trix-content-type="application/zip"
class="attachment attachment--content attachment--zip"
>
<figure class="attachment attachment--file attachment--zip">
<figcaption class="attachment__caption">
<span class="attachment__name">monaco.ttf-master.zip</span>
<span class="attachment__size">86.9 KB</span>
</figcaption>
</figure>
<figcaption class="attachment__caption"></figcaption>
</figure>
</div>

Có thể thấy nó khá giống với content của <trix-editor></trix-editor> đúng không nào?

Ta sẽ save đống params này lại, và xem DB ta chứa gì?

app_development=# SELECT body FROM action_text_rich_texts WHERE id = 3;
<div>
<a href="http://localhost:60100/posts/new"
>http://localhost:60100/posts/new</a
>
</div>
<div>
<strong>Hello world<br /></strong>
<action-text-attachment
sgid="BAh7CEkiCGdpZAY6BkVUSSIvZ2lkOi8vYXBwL0FjdGl2ZVN0b3JhZ2U6OkJsb2IvNz9leHBpcmVzX2luBjsAVEkiDHB1cnBvc2UGOwBUSSIPYXR0YWNoYWJsZQY7AFRJIg9leHBpcmVzX2F0BjsAVDA=--97b885c24fd3d87464525f34a7b6ea117e4c72e6"
content-type="application/zip"
url="http://localhost:60100/rails/active_storage/blobs/eyJfcmFpbHMiOnsibWVzc2FnZSI6IkJBaHBEQT09IiwiZXhwIjpudWxsLCJwdXIiOiJibG9iX2lkIn19--940badfc5aee704ef3f98085f87f909baf870660/monaco.ttf-master.zip"
filename="monaco.ttf-master.zip"
filesize="88996"
></action-text-attachment>
</div>

Các thẻ khác thì vẫn vậy, tuy nhiên attachments của ta lại có một chút khác biệt. Ở đây đống figure đã được minify lại thành action-text-attachment để cho gọn hơn.

Hãy cùng điều tra xem tại sao lại như vậy? Trước tiên ta vào xem ActionText::RichText của ta chứa gì ma giáo

# https://github.com/rails/rails/blob/027085a5972a798cfea60f829a9edabbd67a2818/actiontext/app/models/action_text/rich_text.rb#L11
class ActionText::RichText < ActiveRecord::Base
serialize :body, ActionText::Content
end

Vậy là body của ta đang được serialize bởi ActionText::Content, mò đến đó tiếp thôi.

# https://github.com/rails/rails/blob/df8ee09ce71338cdf9816225df1bdebc707f3560/actiontext/lib/action_text/content.rb#L15
class ActionText::Content
class << self
def fragment_by_canonicalizing_content(content)
fragment = ActionText::Attachment.fragment_by_canonicalizing_attachments(content)
fragment = ActionText::AttachmentGallery.fragment_by_canonicalizing_attachment_galleries(fragment)
fragment
end
end

def initialize(content = nil, options = {})
options.with_defaults! canonicalize: true

if options[:canonicalize]
@fragment = self.class.fragment_by_canonicalizing_content(content)
else
@fragment = ActionText::Fragment.wrap(content)
end
end
end

Ta sẽ quan tâm tới hàm initialize trước, khi serialize, mặc định là ta đang không dùng tham số, vậy là options sử dụng sẽ là canonicalize: true, xem tiếp fragment_by_canonicalizing_content nào. Có vẻ lại phải mò fragment_by_canonicalizing_attachments tiếp @@

# https://github.com/rails/rails/blob/df8ee09ce7/actiontext/lib/action_text/attachment.rb#L11
class ActionText::Attachment
TAG_NAME = "action-text-attachment"
SELECTOR = TAG_NAME

class << self
def fragment_by_canonicalizing_attachments(content)
fragment_by_minifying_attachments(
fragment_by_converting_trix_attachments(content)
)
end
end
end

fragment_by_minifying_attachments, bạn có thấy từ minify không? Có vẻ ta đang đi đúng hướng. Hãy tiếp tục, nhưng hãy bắt đầu bằng fragment_by_converting_trix_attachments

# https://github.com/rails/rails/blob/df8ee09ce71338cdf9816225df1bdebc707f3560/actiontext/lib/action_text/attachments/trix_conversion.rb#L9
module ActionText::Attachments::TrixConversion
class_methods do
def fragment_by_converting_trix_attachments(content)
Fragment.wrap(content).replace(TrixAttachment::SELECTOR) do |node|
from_trix_attachment(TrixAttachment.new(node))
end
end
end
end

Nôm na là đoạn này sẽ replace toàn bộ ActionText::TrixAttachment::SELECTOR = "[data-trix-attachment] bằng thẻ ActionText::Attachment::SELECTOR = "action-text-attachment".

module ActionText::Attachments::Minification
class_methods do
def fragment_by_minifying_attachments(content)
Fragment.wrap(content).replace(ActionText::Attachment::SELECTOR) do |node|
node.tap { |n| n.inner_html = "" }
end
end
end
end

Hàm fragment_by_minifying_attachments của chúng ta sẽ remove toàn bộ inner content của thẻ action-text-attachment.

Sau một hồi lòng vòng, cuối cùng ta đã biết được tại sao đống figure rối rắm kia trở thành action-text-attachment gọn gàng hơn rất nhiều.

Hiển thị dữ liệu

Hãy vào màn hình detail, và thử inspect element, ta sẽ thấy attachment của ta lại trở về dạng đầy đủ:

<%= @post.content =>

Đây là những gì ta thu được.

<div class="trix-content">
<div>
<a href="http://localhost:60100/posts/new"
>http://localhost:60100/posts/new</a
>
</div>
<div>
<strong>Hello world<br /></strong>
<action-text-attachment
sgid="BAh7CEkiCGdpZAY6BkVUSSIvZ2lkOi8vYXBwL0FjdGl2ZVN0b3JhZ2U6OkJsb2IvNz9leHBpcmVzX2luBjsAVEkiDHB1cnBvc2UGOwBUSSIPYXR0YWNoYWJsZQY7AFRJIg9leHBpcmVzX2F0BjsAVDA=--97b885c24fd3d87464525f34a7b6ea117e4c72e6"
content-type="application/zip"
url="http://localhost:60100/rails/active_storage/blobs/eyJfcmFpbHMiOnsibWVzc2FnZSI6IkJBaHBEQT09IiwiZXhwIjpudWxsLCJwdXIiOiJibG9iX2lkIn19--940badfc5aee704ef3f98085f87f909baf870660/monaco.ttf-master.zip"
filename="monaco.ttf-master.zip"
filesize="88996"
>
<figure class="attachment attachment--file attachment--zip">
<figcaption class="attachment__caption">
<span class="attachment__name">monaco.ttf-master.zip</span>
<span class="attachment__size">86.9 KB</span>
</figcaption>
</figure>
</action-text-attachment>
</div>
</div>

Bạn còn nhớ mình ghi ở trên, khi ta viết @post.content, thực chất ta đang gọi @post.content.to_s chứ?

Thử đào sâu vào chút:

# https://github.com/rails/rails/blob/df8ee09ce7/actiontext/lib/action_text/content.rb#L90
def to_rendered_html_with_layout
renderer.render(partial: "action_text/content/layout", locals: { content: self })
end

def to_s
to_rendered_html_with_layout
end
<%# https://github.com/rails/rails/blob/df8ee09ce7/actiontext/app/views/action_text/content/_layout.html.erb %>
<div class="trix-content">
<%= render_action_text_content(content) %>
</div>
# https://github.com/rails/rails/blob/0ec2a907545e47f816993b9fd8cabb552454b1a2/actiontext/app/helpers/action_text/content_helper.rb#L12
def render_action_text_content(content)
sanitize_action_text_content(render_action_text_attachments(content))
end

def sanitize_action_text_content(content)
sanitizer.sanitize(content.to_html, tags: allowed_tags, attributes: allowed_attributes, scrubber: scrubber).html_safe
end

def render_action_text_attachments(content)
content.render_attachments do |attachment|
unless attachment.in?(content.gallery_attachments)
attachment.node.tap do |node|
node.inner_html = render(attachment, in_gallery: false).chomp
end
end
end.render_attachment_galleries do |attachment_gallery|
render(layout: attachment_gallery, object: attachment_gallery) do
attachment_gallery.attachments.map do |attachment|
attachment.node.inner_html = render(attachment, in_gallery: true).chomp
attachment.to_html
end.join("").html_safe
end.chomp
end
end

Đại khái là Rails sẽ sanitize đống rich text của ta để tránh XSS attack, và render template đối với những attachment.

Integrate với Active Storage

Hãy quay trở lại với model ActionText::RichText

# https://github.com/rails/rails/blob/df8ee09ce7/actiontext/app/models/action_text/rich_text.rb#L14
class ActionText::RichText < ActiveRecord::Base
has_many_attached :embeds

before_save do
self.embeds = body.attachments.map(&:attachable) if body.present?
end
end

Ta dễ dàng hiểu 1 cách tổng quan là Rails sẽ tiến hành extract toàn bộ attachment trong body, gán vào embeds. Sau đó sẽ save đống association này lại.

Thử xem Rails sẽ extract attachments ra làm sao.

# https://github.com/rails/rails/blob/027085a5972a798cfea60f829a9edabbd67a2818/actiontext/lib/action_text/content.rb#L53
def attachables
@attachables ||= attachment_nodes.map do |node|
ActionText::Attachable.from_node(node)
end
end

# https://github.com/rails/rails/blob/027085a5972a798cfea60f829a9edabbd67a2818/actiontext/lib/action_text/content.rb#L113
def attachment_nodes
@attachment_nodes ||= fragment.find_all(ActionText::Attachment::SELECTOR)
end

Rails sẽ tìm kiếm tất cả thẻ action-text-attachment, extract những thông tin cần thiết để init được ActiveStorage::Blob object.

Ta cần nghía qua hàm Attachable.from_node nữa

# https://github.com/rails/rails/blob/027085a5972a798cfea60f829a9edabbd67a2818/actiontext/lib/action_text/attachable.rb#L10
def from_node(node)
if attachable = attachable_from_sgid(node["sgid"])
attachable
elsif attachable = ActionText::Attachables::ContentAttachment.from_node(node)
attachable
elsif attachable = ActionText::Attachables::RemoteImage.from_node(node)
attachable
else
ActionText::Attachables::MissingAttachable
end
end

Trong trường hợp này, Rails sẽ luôn extract theo strategy là sgid, các bạn không cần quan tâm tới 3 nhánh dưới làm gì cho mất công.

Còn nhớ phần trên mình đã đề cập tới sgid chứ?

//github.com/rails/rails/blob/cc1a5d5620c4cd952b27f6c1bbd16d8780a34d0e/actiontext/app/javascript/actiontext/attachment_upload.js#L26
https: this.attachment.setAttributes({
sgid: attributes.attachable_sgid,
url: this.createBlobUrl(attributes.signed_id, attributes.filename),
});

Callback này được gọi sau khi file được upload thành công. Vậy sgid là cái gì?

sigd được encrypt từ id của attachment sau khi upload. Khi gửi lên, server sẽ decrypt nó để lấy lại id, gán attachment vào record.

Tại sao lại cần encrypt? Các bạn cứ tưởng tượng, nếu dùng thẳng id, do ta upload ảnh trước khi tạo record, nên khi gửi params từ client lên, chắc chắn sẽ phải đưa attachment id vào để server lưu đúng association. Client nó gửi đúng thì không sao, nhưng nếu nó gửi id attachment của người khác thì sao? Attachment đó sẽ chuyển chủ ngay lập tức :v Còn nếu encrypt thì user đố mà mò được mã hash của attachment người khác.

attachable_from_sgid(node["sgid"]) sẽ trả về ActiveStorage::Blob object

# https://github.com/rails/rails/blob/f1b8bb4e1f16e4029ddf05515db0c01942521116/actiontext/lib/action_text/attachable.rb#L22
def from_attachable_sgid(sgid, options = {})
method = sgid.is_a?(Array) ? :locate_many_signed : :locate_signed
record = GlobalID::Locator.public_send(method, sgid, options.merge(for: LOCATOR_NAME))
record || raise(ActiveRecord::RecordNotFound)
end

Nếu không tin, bạn hãy thử rails c và gọi hàm:

GlobalID::Locator.locate_signed(sgid, { for: "attachable" })

Kết luận

Action Text được thiết kế khá hay, code gọn, tất cả method đều rất ngắn, dễ hiểu.

Do là built-in nên ta cũng chả cần cài cắm gì thêm mệt người. Nếu đã upgrade lên Rails 6, bạn hãy thử trải nghiệm nó xem.

Còn đối với phiên bản thấp hơn, ta cũng có thể áp dụng flow của Action Text để build một package hỗ trợ richtext.

· 7 min read
Lê Sĩ Bích

Một vài lưu ý trước khi bắt đầu.

  • Code demo trong bài sẽ sử dụng rspec, capybara, factory_bot (Ruby/Rails), hướng tới đối tượng Web developer.
  • Bài viết không tránh khỏi thiếu sót, nếu có chỗ nào không đúng, mọi người cứ quăng gạch ở dưới comment :v

Ông cha ta có câu "Dục tốc bất đạt". Trước khi đi vào chi tiết, ta hãy cùng điểm qua một vài khái niệm trước.

Nếu bạn là một developer, chắc hẳn sẽ không lạ lẫm gì khái niệm "testing".

Ví dụ khi bạn lập trình chức năng đăng nhập của 1 trang web. Sau một hồi hì hục code, chắc hẳn bạn sẽ vào trang đó, tiến hành đăng nhập, rồi chờ xem code mình có chạy đúng hay không :v

Tuy nhiên giờ đây, đa số đều sử dụng các automated test script để tự động hóa quá trình test. Hơn thế, nó còn giúp những người maintainer sau này có thể hiểu cái đống hổ lốn code bạn để lại chạy như thế nào.

Test khác với Debug.

Các loại test nên chú ý:

  • Unit test: test riêng lẻ từng class/function, viết khá dễ.
  • Integration test, Feature test: ở đây bắt đầu có sự kết hợp giữa nhiều module với nhau để mô tả 1 (hay nhiều) chức năng của ứng dụng.

Màu sắc đặc trưng:

  • Đỏ: xin chia buồn test của bạn đã tạch =))
  • Xanh: chúc mừng, test đã pass, code của bạn "có thể" đã chạy đúng.

2. TDD - Test Driven Development

Dịch ra thì sẽ là Phát triển với trọng tâm là kiểm thử (test), hay nôm na là test trước code sau.

TDD

  • Trước tiên ta viết các test script và chạy chúng, tất nhiên là sẽ fail vì làm gì có code =))

    VD ta muốn viết 1 hàm tính số Fibonacci:

    Fibonacci

    # spec/fibonacci_spec.rb
    describe "#fibonacci_of" do
    context "one" do
    it "returns 1" do
    expect(fibonacci_of(1)).to eq 1
    end
    end

    context "two" do
    it "returns 1" do
    expect(fibonacci_of(2)).to eq 1
    end
    end

    context "greater than two" do
    it "returns sum of two elements before" do
    expect(fibonacci_of(4)).to eq 3
    end
    end
    end
  • Rồi ta mới bắt tay vào code, chạy test, nếu fail thì lại hì hục sửa, hỏng đâu vá đó. Lúc này bạn chưa cần bận tâm về việc code mình có dễ hiểu/đẹp không.

    Và sau 1 hồi thì cuối cùng test ta cũng pass :v

    # fibonacci.rb
    def fibonacci_of(n)
    case n
    when 1
    1
    when 2
    1
    else
    fibonacci_of(n - 1) + fibonacci_of(n - 2)
    end
    end
  • Ta sẽ nhìn lại đống hổ lốn mà ta vừa viết ra, tỉa tót lại cho đẹp mắt, tách service các thứ. Và nhớ rằng đừng làm cho test đỏ lòm.

    # fibonacci.rb
    def fibonacci_of(n)
    return 1 if [1, 2].include?(n)
    fibonacci_of(n - 1) + fibonacci_of(n - 2)
    end

Lưu ý: Không phải cứ test pass là app của ta đã chạy đúng, việc này còn bao gồm nhiều yếu tố khác như

  • Ta có hiểu đúng yêu cầu của khách hàng không
  • Test của ta đã bao gồm hết các trường hợp có thể chưa

Có thể dễ dàng nhận thấy, hàm #fibonacci_of ở trên sẽ chết ngay lập tức nếu gặp tham số <= 0.

3. BDD - Behavior Driven Development

BDD

Kế thừa người tiền nhiệm TDD với phương châm "Test trước code sau", BDD chỉ khác chút là ta sẽ tập trung vào hành vi người dùng (feature).

Theo đó, ta sẽ viết các feature test trước (mô tả một tính năng của ứng dụng, hoặc usecase/userstory). Với mỗi feature test đó, ta có thể sẽ phải triển khai thêm 1 vài unit test/integration test cho các class/function cần thiết trong feature test.

Ví dụ: Ta muốn xây dựng tính năng tạo album cho ứng dụng quản lý album nhạc.

Trước hết hãy hình dung tính năng này trong đầu:

Admin từ trang index albums (/albums), bấm nút "Add album", 1 form sẽ hiện ra để nhập thông tin album (bao gồm title và artist name).

Nếu anh admin này nhập đúng, hãy redirect sang trang index và hiển thị album mới này, còn không thì hãy hiện lỗi để anh admin còn biết đường mà lần.

Feature test của ta sẽ như sau:

# spec/features/create_album_spec.rb
RSpec.feature "album creating process", type: :feature do
context "all fields are filled correctly" do
it "create a new album" do
visit '/albums'
click_link 'Add album'

within 'form#album_form' do
fill_in 'Title', with: 'Chay ngay di'
fill_in 'Artist name', with: "Sep'ss"
end
click_button 'Create'

expect(page).to have_content('Chay ngay di')
end
end

context "title is blank" do
it "show errors" do
visit '/albums'
click_link 'Add album'

within 'form#album_form' do
fill_in 'Artist name', with: "Sep'ss"
end
click_button 'Create'

expect(page).to have_content("Title can't be blank")
end
end
end

Nếu làm theo đúng flow của Rails, ta sẽ phải viết unit test cho:

  • Controller: index, create - test xem logic bên trong đã đúng chưa, status code ra sao.
  • View: new, index - test xem trường hợp có lỗi thì form hiển thị sao, hay trường hợp không có album thì view index có thông báo cho người dùng biết hay không.
  • Model: album - test xem validate có hoạt động hay không.

Chi tiết thì mình xin lược bớt vì dài quá, bạn có thể tham khảo thêm ở đây.

Nếu bạn băn khoăn nên test cái gì trong Rails, có thể tham khảo bài này.

3. Các nguyên tắc khi viết test (TDD)

  1. Chỉ viết code khi nó cần thiết để test của bạn pass.

    VD bạn viết một hàm lấy về email của người dùng theo id.

    def get_user_mail_by_id(id)
    user = User.find(id)
    user.mail
    end

    Ở đây bắt buộc phải truy vấn CSDL để tìm ra user. Không dùng find thì lấy thông tin user thế nào :v

  2. Chỉ viết nên unit test trong phạm vi vừa đủ.

4. Ưu điểm

  • Những người não to trên thế giới đã chứng minh được TDD giúp thay đổi mindset của bạn, và bạn sẽ trở thành những lập trình viên tốt hơn.

    Nó đòi hỏi bạn phải thu tập trung hơn vào những chi tiết nhỏ để test của mình pass, hơn là suy nghĩ vẩn vơ về cả cái app to đùng.

  • Ngoài kiểm thử, test cũng là docs cho maintainer sau này, nó cung cấp chi tiết về các đặc tả kỹ thuật (specification) của app.

  • Ít bug hơn, dễ bảo trì, phát hiện lỗi sớm.

  • Cho bạn biết code mà bạn vừa viết xong nó làm hỏng cả app không =))

5. Kết luận

  • TDD/BDD thực sự rất tốt, nếu bạn muốn trở thành một lập trình viên tốt hơn, hãy cố gắng tryhard :v

  • Thường mọi người hay có xu hướng code xong mới viết test, và mình cũng là một trong số đó =)). Tuy vậy, hãy cố gắng viết test case của mình thật minh bạch, dễ hiểu, vì chính bản thân ta và các maintainer sau này.

6. Tham khảo